
Introduction
When you’re using 3D printers, time matters a lot. Whether you’re just having fun making prototypes or running a business and fulfilling orders, faster printing means you get more done. But to print things quickly, you need to understand some tips and make smart choices. In this article, we’ll explore ten effective techniques and tips to speed up your 3D prints and achieve quicker results. We will consider Kingroon KP3S Pro V2 as our printer, OrcaSlicer as our slicer and the 3DBenchy as our project to apply these tips and see in practical how we will decrease the printing time while maintaining good quality. Let’s dive right in! 🚀
Kingroon KP3S Pro V2 is a fast reliable 3D printer that come with Klipper pre-installed and has linear rail guides on all axis which enables it to reach high speeds of 350mm/s.
If you are interesting more in this printer, feel free to visit the official website through this link.
But before we dive into the techniques, let’s cover some essential topics related to 3D printing speed:
Overview of Factors Affecting 3D Printing Speed
There are many factors that affect the speed of your printer. Let’s break them down:
1. Hardware:
The speed of your 3D printer is directly influenced by the performance of its components. These components include the printer’s mechanism type (whether it’s coreXY or Cartesian), the quality and type of the moving guide, the efficiency of the hot end, the nozzle size, and the precision of the stepper motors and drivers. That is why choosing the right printer from the beginning means a lot as a printer like Kingroon KP3S Pro V2 can reach up high speeds while maintain perfect quality.
If you’re curious about the differences between Cartesian and coreXY printers and its relation with the speed, we have a comprehensive comparison guide available for you to explore.
2. Filament:
While selecting a filament type is primarily driven by the need for specific mechanical properties and applications, it’s essential to know that this choice significantly affects printing speed limit as each filament type has its unique maximum volumetric speed value. For example:
● The PLA has a Max volumetric speed of 15 mm3/s
● The ASA or ABS has a Max volumetric speed of 11 mm3/s
● The PETG has a Max volumetric speed of 8 mm3/s
● The (TPU/TPE) has a Max volumetric speed of 1-2.5 mm3/s
The maximum volumetric speed refers to the maximum rate at which filament can be extruded through the printer’s nozzle. It is typically measured in cubic millimeters per second (mm³/s).
3. Software Settings:
Slicer settings, including layer height, infill density, and support structures, play a crucial role in determining print speed and printing time and here most of our tips are exist as we can easily change these values to increase speed. However, we cannot change the printer’s mechanism.
Also, the firmware of the 3D printer significantly influences its speed. Our Kingroon KP3S Pro V2 uses Klipper firmware, which relies on a single-board computer for complex calculations, unlike the Marlin firmware that uses a microcontroller. This distinction allows Klipper to perform quicker calculations which means quicker speeds.
3. Print Techniques:
Exploring advanced techniques like draft mode printing or adaptive layer height can further optimize the overall speed of your prints.
Now, that you understand what the Factors Affecting 3D Printing Speed. Let’s understand what is the 3D printing speed in depth.
What is 3D printing speed?
3D printing speed refers to the rate at which a 3D printer can deposit material to create a physical object from a digital model. It is typically measured in millimeters per second (mm/s), indicating how fast the print head moves along the X, Y, and Z axes. This speed can significantly vary depending on the printer's capabilities, the complexity of the object being printed, and the chosen settings. It's essential to understand that 3D printing speed is not just about how quickly a printer can complete a job; it's also about the efficiency of material deposition and the precision with which it can recreate the digital model in physical form.
What we will try to focus on in this article is to increase this speed values as much as possible while maintaining quality. We will also learn some tips and tricks to reduce the printing time.
Before we start, make sure to download the 3DBenchy model from its official website. Additionally, we’ll be using OrcaSlicer with a new project, using the default profile for the Kingroon KP3S Pro V2.
Let’s get started!
After opening a new project using the default profile of Kingroon KP3S Pro V2 in OrcaSlicer, let’s slice the plate with 3DBenchy with 300% scale to know the starting point which we will start from and then decrease the printing time while maintaining good quality.
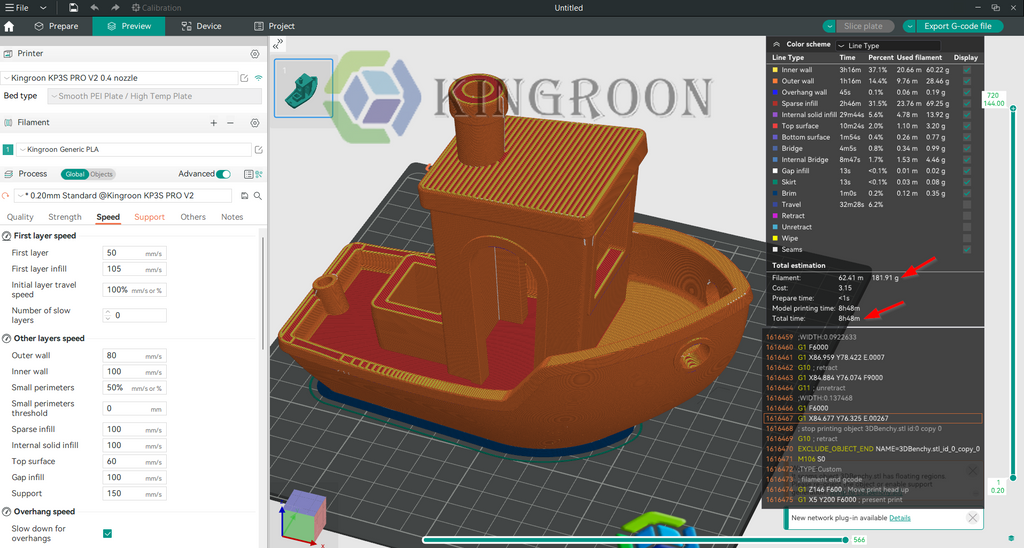
Note: we've tripled the size of the 3DBenchy to make it easier to spot the differences in the printing time.
As we see in the previous image, the total printing time of the 3DBenchy with the default printing setting is 8hrs and 48 minutes. It weighed 181.91 grams using Kingroon Generic PLA.
Let’s start tweak some sittings and apply other tips and see its effect on reducing the total printing time.
Use a large nozzle
Switching to a larger nozzle can significantly decrease print time. The standard nozzle size in the default profile which we are using is about 0.4mm, but by using a nozzle that's 0.6mm or even 0.8mm, we can extrude more material. This means we can reduce the printing time. But remember, a larger nozzle may reduce print detail, but for larger objects or parts where fine detail isn't critical, i’s a great way to speed up the process.
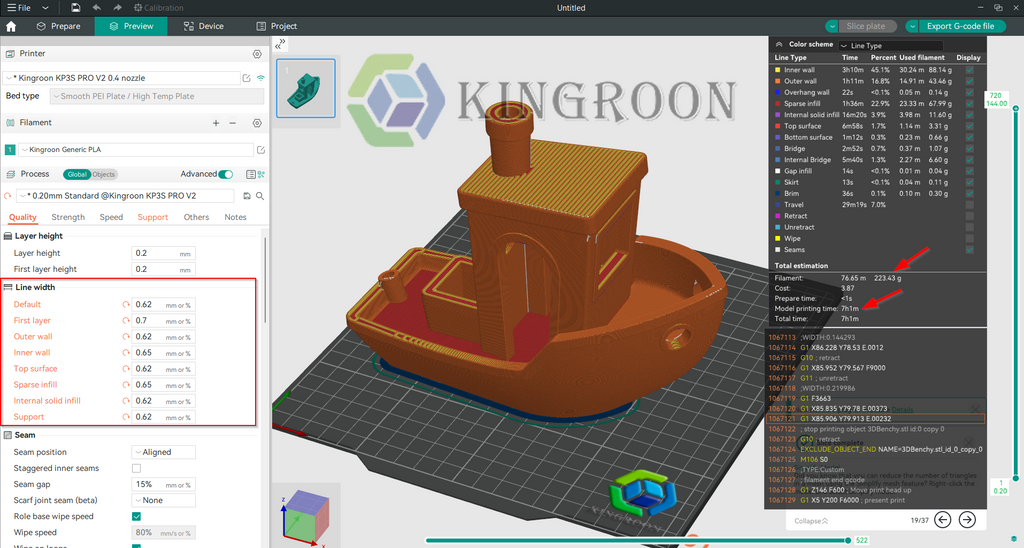
By updating the nozzle in our profile from 0.4mm to 0.6mm and increase the exist line width by 0.2 to take effect, the total printing time reduces from 8hrs and 48 minutes to 7hrs and 1 minutes. we have saved about one hour and 47 minutes!
It's worth noting that as a result of increasing the line width, the total weight of the print has also gone up to 223.43g. A practical solution to address this without compromising the overall wall thickness would be to reduce the number of perimeters (or walls) from three to two. This adjustment maintains the same total wall thickness as you would achieve with a 0.4mm line width and three perimeters, effectively managing the weight increase while preserving structural integrity and save some more time!
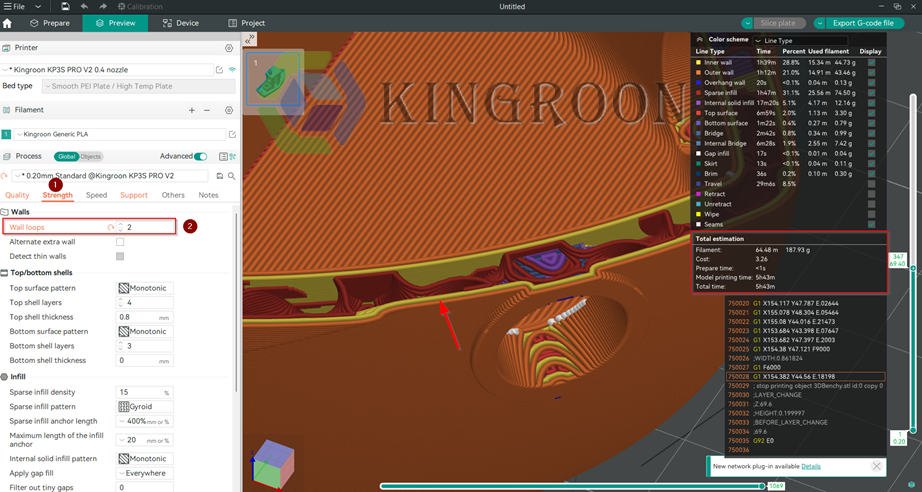
After this update as we see in the previous image, we've managed to save an additional 1 hour and 18 minutes, and have also decreased the weight to 187.93g again while maintaining total wall thickness of 1.2mm.
Increase inner wall speed
The default inner wall speed for the Kingroon KP3S Pro V2 profile in OrcaSlicer is set at 100mm/s, which is relatively slow compared to the printer’s capabilities. However, we have the opportunity to increase this speed up to 200mm/s without impacting the outer wall speed. This adjustment won’t compromise print quality because it does not change the outer wall speed but will significantly reduce the printing time.

After adjusting the value as shown in the previous image, the printing time has decreased to 6 hours and 58 minutes, resulting in a time savings of 1 hour and 50 minutes.
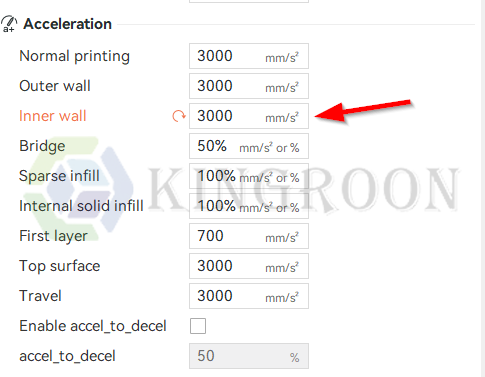
Note: It’s crucial to set the inner wall acceleration to 3000 mm/s² for this speed adjustment to take effect.
Infill speed
Increasing the infill speed is another effective method to reduce the total printing time without sacrificing the external appearance of your print. The infill, which provides internal structure and support, doesn't need to be as precisely printed as the outer layers that are visible. By default, the Kingroon KP3S Pro V2 profile in OrcaSlicer may set the infill speed with 100mm/s. Let’s try to increase it to 200mm/s and see how much time will we save?
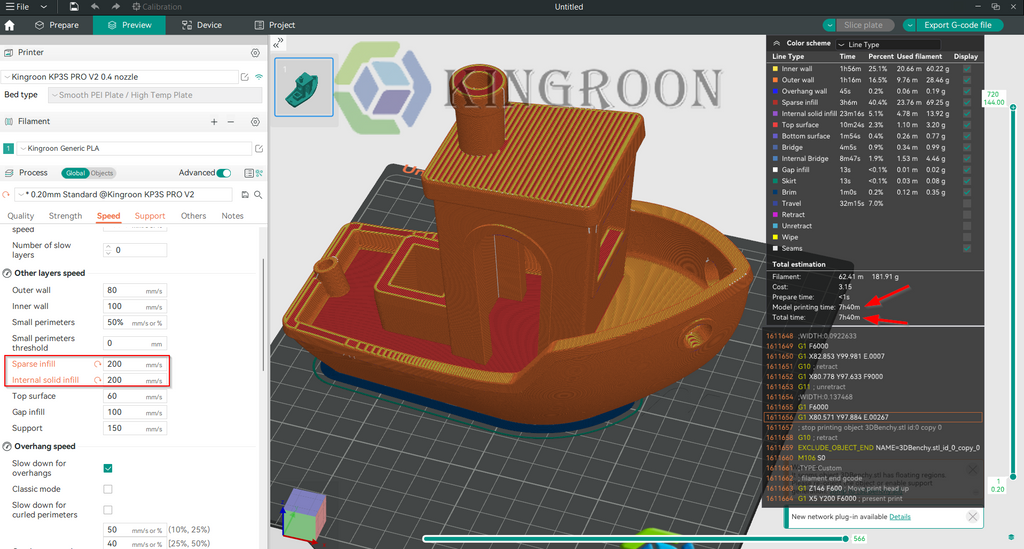
As we see in the previous image, we have saved about one hour and 8 minutes after increasing the infill speed.
Infill pattern
The infill pattern you choose can also significantly impact printing speed, as well as the strength and weight of your finished print. Common infill patterns include grid, honeycomb, triangles, and lines. Each pattern offers different benefits in terms of strength and material usage, but also some are quicker to print than others.
For speeding up print times, simpler patterns such as lines or grids are generally faster to print than more complex patterns like honeycomb. This is because simpler patterns require fewer movements and can be laid down more quickly by the printer. Choosing a simpler infill pattern can lead to noticeable reductions in overall printing time, especially for prints that do not require the extra strength provided by more complex patterns.
The default Infill pattern at Kingroon KP3S Pro V2 in OrcaSlicer is Gyroid if we use a complex one like honeycomb the printing time will increase to 10 hours and 14 minutes. If we use a simple one like the line pattern, the printing time will decrease to 8 hours and 16 minutes, which means we will save about 32 minutes.
Feel free to try different infill pattern and see the effect on the printing time and the patterns that will suit your project.
Other tips and tricks to reduce the printing time
To keep this guide concise, here are more quick tips to speed up your 3D printing. These tips should be compatible with the majority of slicer software out there:
1. 5- Top/Bottom Speed
Adjusting the speed for printing the top and bottom layers of your print can also contribute to reducing overall print time. These layers are crucial for the appearance and strength of your print, but often, the default settings in your slicer are set for quality over speed. If you're looking for quicker prints and the very top or bottom finish isn't critical, consider increasing the speed for these layers. However, be cautious, as setting the speed too high can lead to poor adhesion and finish quality. A moderate increase can save time without significantly compromising the print's aesthetics.
2. Infill Layer Thickness
For parts that don't require high strength throughout, you can opt for thicker layers within the infill while maintaining thinner layers on the outer walls for a smooth finish. This technique, known as variable layer height, allows for faster printing by reducing the number of layers needed inside the object. Thicker infill layers contribute to faster print times because the printer deposits more material per layer, thus requiring fewer passes to fill the interior. This setting can be particularly useful for large objects where internal detail is not visible.
3. Support Infill Layer Thickness
Similarly, to infill layer thickness, adjusting the support infill layer thickness can save a significant amount of time on prints that require support structures. By increasing the layer height for support structures, you can reduce the print time since the printer will need to make fewer passes to build up these supports. Since supports are removed after printing, the quality of their finish is less important, making this an easy area to save time.
4. Optimize Travel Moves
Increasing the travel speed involves setting a higher speed for the print head when it moves across the print bed without extruding filament. This can significantly reduce the overall printing time by minimizing the duration of non-printing movements.
5. Combine Prints
If you're printing multiple small items, combining them into a single print job can be more time-efficient than printing them individually. This approach can minimize the start-stop actions of the printer, which tend to be slower. Positioning items closely together without them merging can maximize the efficiency of each print layer.
6. Experiment with Software Features
Modern slicer software offers a variety of features designed to speed up printing, such as "Lightning" infill patterns, which are sparse and designed for speed, or adaptive slicing, where the slicer adjusts layer heights throughout the print based on the level of detail required. Exploring and experimenting with these features can lead to significant time savings.
By implementing these additional tips and tricks, you can further reduce the printing time on your Kingroon KP3S Pro V2 or any 3D printer. Remember, the key to efficient 3D printing is balancing speed with the quality and strength requirements of your final print. Testing and tweaking these settings based on your printer's capabilities and the specifics of your project will help you find the perfect setup for faster, yet still high-quality, 3D prints.
FAQs
Q1: Will increasing the printing speed compromise the quality of my prints?
A1: Increasing printing speed can potentially compromise print quality, especially if adjustments are made without considering the capabilities of the printer and the material being used. However, by carefully tweaking settings like layer height, infill density, and ensuring your printer is well-maintained, you can find a balance that allows for faster printing with minimal impact on quality.
Q2: How can I tell if my printer can handle higher speeds?
A2: To determine if your printer can handle higher speeds, start by consulting the manufacturer's recommendations. Then, experiment by gradually increasing speeds for different print aspects (like infill, inner/outer walls) and observe the results. If the print quality remains acceptable and the printer operates smoothly without signs of strain, you can consider those speeds viable.
Q3: Can I use all these tips at once?
A3: While you can apply multiple tips simultaneously, it's crucial to test each change individually to understand its impact on print quality and time. Once you’re comfortable with the results of each adjustment, you can start combining them to maximize speed improvements.
Q4: Are these tips applicable to all types of 3D printers?
A4: While these tips are generally applicable across various 3D printers, the specific impact and feasibility of each tip can vary depending on the printer's design, firmware, and capabilities. Always consider your printer's specifications and limits when applying these suggestions.
Q5: How important is slicer software in increasing 3D printing speed?
A5: Slicer software plays a critical role in 3D printing speed, as it translates your 3D model into instructions that your printer follows. The settings you choose in your slicer, such as layer height, infill density, and print speed, directly influence the printing time. Utilizing features like draft mode or adaptive slicing can significantly speed up prints with the right adjustments.
Q6: Can hardware upgrades increase my printer's speed?
A6: Yes, hardware upgrades like a more powerful stepper motor, a better cooling system, or a high-quality hot end can increase your printer's speed by allowing it to operate more efficiently and handle higher speeds without sacrificing print quality.
Q7: Is it possible to print fast and still maintain high detail in prints?
A7: Printing fast while maintaining high detail is challenging but possible with the right adjustments and by leveraging your printer's strengths. Techniques such as using a smaller nozzle for detailed outer layers and a larger nozzle or higher layer height for infill can help balance speed and detail.
Conclusion
Wrapping up, making your 3D prints faster without losing quality comes down to tweaking a few settings and knowing what your printer can handle. With simple changes like choosing a bigger nozzle, playing around with how much material fills your print, and using your slicing software smartly, you can cut down on wait times. It’s all about trying different things to see what works best for you. So, dive in, adjust a bit here and there, and watch your prints come to life quicker without compromising how good they look!