
Introduction
3D printing is a fascinating technology that allows you to create almost anything you can imagine from a digital model. However, it also comes with some challenges and limitations, such as the speed of the printed parts. It is a critical setting that not only affects the appearance and functionality of 3D prints but also controls how much time your print will take in the printing process. We all need to print awesome prints on time, and knowing the maximum safe printing speed will help you easily achieve that.
In a previous article, we explored some tips and tricks that let you save a lot of time in printing, such as increasing the speed for specific components of the print that do not affect the external quality. But what we will do in this article is perform a speed test to determine the maximum speed that we can reach without affecting the quality.
In this article, we will consider Kingroon KP3S Pro V2 as our printer and OrcaSlicer as our slicer.
The Kingroon KP3S Pro V2 is a high-speed 3D printer equipped with Klipper pre-installed. Its linear rail guides on all axes allow it to achieve impressive speeds of up to 350 mm/s. If you’re curious to learn more about this printer or make a purschase, feel free to visit the official website via this link.
As we will use OrcaSlicer for our speed test let’s understand what is OrcaSlicer?
Overview of OrcaSlicer
OrcaSlicer is an open-source slicer for FDM printers. It is a fork of Bambu Studio, a popular slicing software for BambuLab 3D printers. OrcaSlicer was developed by a programmer who wanted to improve the original software and add more features and options for users. Some of the main features of OrcaSlicer are:
Auto calibrations for all printers: OrcaSlicer provides automatic calibration options for all types of printers, ensuring optimal performance.
Sandwich (inner-outer-inner): This mode, an improved version of the External Perimeters First mode, enhances print quality by optimizing layer sequencing.
Precise wall: Achieve precise and consistent wall thickness for your prints.
Polyholes conversion support: Easily handle complex geometries with polyholes.
Klipper support: Seamlessly integrate with Klipper firmware for advanced control.
More granular controls: Customize settings to fine-tune your prints.
What makes Orcaslicer special is that it provides easy tests via the build in calibration tools which include the speed test that we will use.
OrcaSlicer is available for Windows, Mac, and Linux platforms. You can download the latest stable or nightly version from the GitHub page.
And before we get started let’s understand first what does speed means in slicing?
In slicing, speed refers to two main things in general:
Print Speed (mm/s)
This is the rate at which the printer's extruder head travels along the predetermined path to deposit filament during printing. Higher print speeds can significantly reduce printing time but can also lead to quality issues like:
Under extrusion: When the printer can't keep up with the speed and doesn't deposit enough filament.
Ghosting: Vibrations caused by high speeds can create faint duplicate lines next to the intended path.
Poor layer adhesion: When the filament doesn't have enough time to properly bond with the previous layer.
Travel Speed (mm/s)
This is the rate at which the extruder head moves between printing paths when it's not depositing filament. Travel speed doesn't directly affect print quality but can significantly impact overall print time.
The Goal of Our Speed Test
The speed test we're about to perform is designed to help us find the highest print speed at which our printer can operate without sacrificing the quality of our prints. By methodically increasing the print speed and observing the effects on a test print, we can identify the "sweet spot." This is the speed at which our printer operates efficiently and produces high-quality prints without the issues associated with high-speed printing.
What is the speed test?
The speed test consists of a vertical, curved wall tower with multi-sectioned areas, each of which is printed at a specific speed. It starts with a slow speed and increases to reach the maximum speed at the top. Using the OrcaSlicer build-in test, you can determine the initial and final speed and the step, and it will automatically generate the test for you. And after the tower has been printed, we will proceed with a detailed analysis. This involves closely examining each section of the tower, from the base to the top, to observe how the quality of the print changes as the speed increases. And then determine the maximum print speed that we can safely use.
This is exactly what we will do in this article.
Let’s get started!
Step 1: Download and Install OrcaSlicer
You can download OrcaSlicer from its GitHub page: OrcaSlicer GitHub. And follow the instructions to install it on your computer.
Step 2: Choose Your Printer, Filament, and Process
Open OrcaSlicer and select the printer “Kingroon KP3S Pro V2”, filament, and process that you want to use for the test. You can use the default profiles that come with the software, or create your own custom profiles if you have different settings.
Step 3: Access the Speed Test Feature
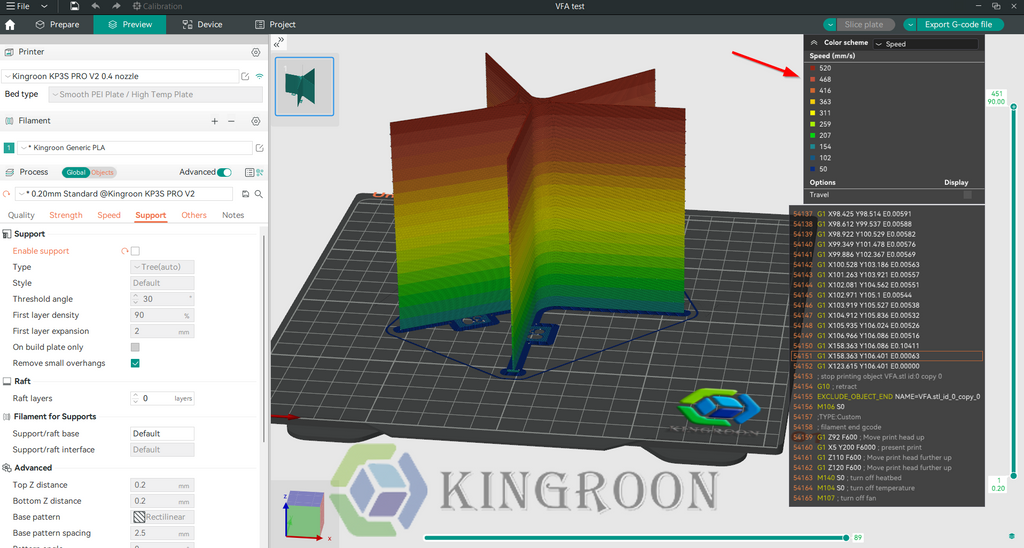
After creating a new project, go to the OrcaSlicer Calibration menu and click on more > VFA option. This will open a new window where you can adjust the speed tower settings.

As our 3D printer is the Kingroon KP3S Pro V2 and can reach high speeds, we will determine a start speed of 160 mm/s and an end speed of 500 mm/s with a step of 20 mm/s for our speed tower.
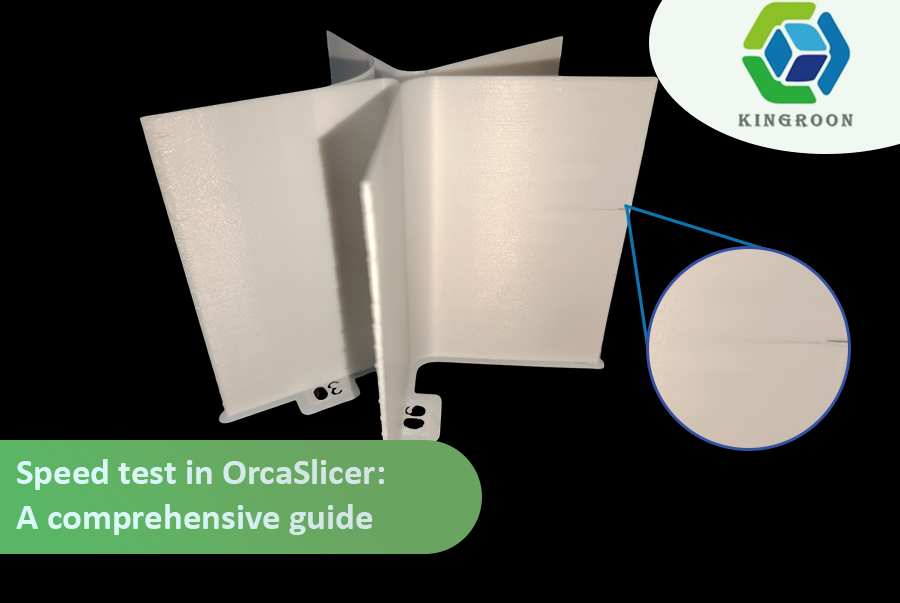
These options will generate a speed tower with multi-sectioned speed areas that starts at 160 mm/s and ends at 500 mm/s, as we see in the following image:
Step 5: Print the Retraction Tower
After slicing the speed tower with the chosen options, you can start printing it. After printing, you will notice that the tower has multiple notches between areas, each area corresponding to a different printing speed. By looking at the tower, you can see how each different speed affects the print quality.
And it's time to dive into the analysis part of the speed test. This is where you'll closely examine the tower from bottom to top.
Step 6: Analyze the Results
Visual Inspection
Begin with a visual inspection of the entire tower. Look for noticeable defects or changes in quality such as stringing, under-extrusion, poor layer adhesion, warping, or any signs of instability in the print. These indicators will help you understand at which speeds your printer starts to struggle with maintaining quality.
Comparative Evaluation
Compare the sections printed at different speeds to identify the speed at which quality starts to decline noticeably. The highest speed that still produces acceptable quality is your sweet spot—it's fast enough to increase productivity without sacrificing the appearance and structural integrity of your prints.
Specific Areas to Focus On
Detail Retention: Assess how well details are preserved across different speeds. This includes sharp edges, and intricate patterns.
Surface Quality: Examine the surface of each section for smoothness, absence of blobs, and uniformity.
Structural Strength: If possible, perform minor stress tests on sections of the tower to evaluate layer adhesion and overall structural strength.
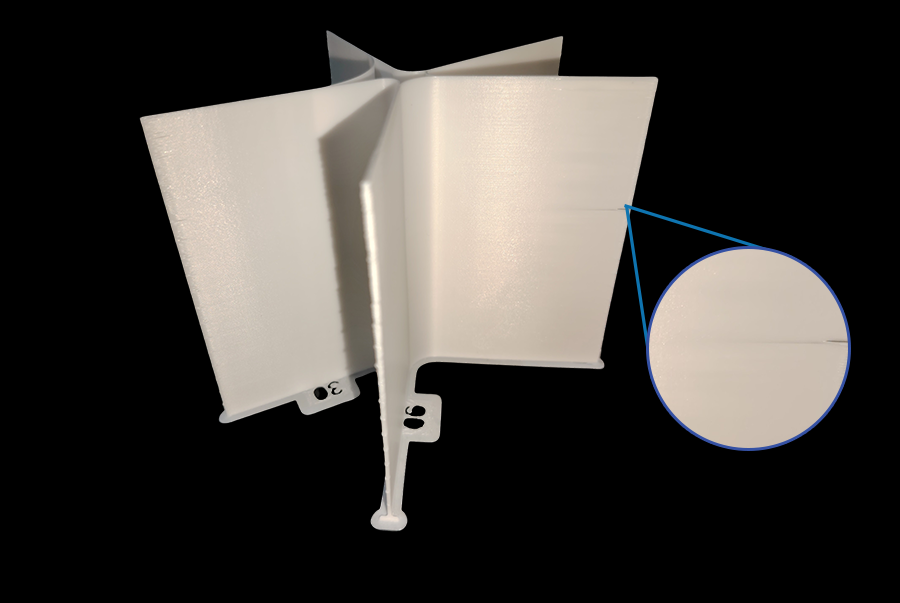
As we see in our test, the maximum speed at which we can print without affecting the quality is located in the 7th area from the bottom. Which means we can print at a speed of up to 280 mm/s using the Kingroon KP3S Pro V2 printer.
Documenting Your Findings
It's crucial to document your observations for each speed segment. Note the speeds that yielded the best results in terms of quality and the speeds that began to show unacceptable quality degradation. This documentation will be a valuable reference for future prints, helping you choose speed settings based on the trade-off between speed and quality you're willing to make.
Applying Your Insights
With the results of the speed test, you can now fine-tune your printing strategies:
Optimize Print Speed Settings: Adjust your default print speed settings in OrcaSlicer based on your findings. For high-quality prints where detail is paramount, you might choose a speed near the lower end of your optimal range. For less critical prints where speed is a priority, you might push the limits closer to the maximum speed identified.
Adjust for Different Materials and Models: Keep in mind that different materials and models may behave differently. Consider performing speed tests for different filament types or particularly challenging models to build a comprehensive profile of optimal settings for your printer.
FAQs
Q1: Why is print speed important in 3D printing?
Print speed significantly affects the overall printing time, the quality of the final print, and the printer's efficiency. Optimizing print speed can help achieve a balance between fast printing and maintaining high-quality results.
Q2: What does a speed test in 3D printing involve?
A speed test involves printing a specially designed model (often a tower) at various speeds to identify the fastest speed that still produces acceptable print quality. This helps find the optimal settings for your printer.
Q3: How can I determine the optimal print speed for my printer?
By analyzing the quality of the test print at different speeds, you can determine the highest speed at which your printer can operate without a noticeable drop in print quality. This speed is considered your optimal print speed.
Q4: What are some common quality issues caused by printing too fast?
Printing too fast can lead to under-extrusion, ghosting (where vibrations cause duplicate images), and poor layer adhesion, among other issues, which degrade the quality of the print.
Q5: How does travel speed differ from print speed?
Travel speed refers to how fast the printer's head moves when not extruding filament, affecting the print's overall time. Print speed, however, involves the speed at which filament is deposited, directly impacting print quality.
Q6: Can I perform a speed test for any 3D printer?
Yes, most 3D printers can undergo a speed test. Adjust the test parameters based on your printer's capabilities and the slicing software you're using.
Q7: What should I do after finding my printer's optimal speed?
Use this speed as a benchmark for future prints that require a similar level of detail and quality, adjusting as necessary for different materials or more complex models.
Q8: Do different materials require different speed settings?
Yes, different materials have unique properties that can affect the optimal print speed. For instance, some materials may print better at lower speeds due to their melting temperatures and cooling rates.
Q9: Is it necessary to perform a speed test for every new print?
Not for every print, but it's a good idea to conduct a speed test when using new materials, switching to significantly different model complexities, or after making upgrades or modifications to your printer.
Q10: Where can I find a model for a speed test?
Speed test models can be found on 3D printing community websites or created using certain slicing software that includes features for generating test patterns like the one in OrcaSlicer.
Conclusion
The speed test is a powerful tool in your 3D printing arsenal, allowing you to push the boundaries of what your Kingroon KP3S Pro V2 can achieve while ensuring that quality doesn't suffer. By taking the time to conduct this test and analyze the results, you set yourself up for success in future projects, balancing speed and quality in a way that suits your needs. Remember, the world of 3D printing is one of constant learning and experimentation. Use the insights gained from this test as a stepping stone to further explore and refine your printing techniques.