If you're a heavy user of a 3D printer, you're likely to get tired of printing via an SD card. Every time when you start a new print, you repeat the same annoying procedures. Take out the SD card from your printer, plug it into your PC, copy G-code files into the card, and then put the card back into the printer. The only way out is to connect your 3D printer to a PC and perform 3D printing directly on your PC. Here, we'll show how to connect an Ender 3 to PC and learn 3D printing via PC.
Before we proceed, be sure you get below items:
1. Ender 3 3D printer
2. Micro USB cable
3. Micro SD card (8GB or less) and card reader
4. PC
Usually, if you buy an Ender 3 3D printer, you'll get a piece of micro USB cable, a micro SD card and card reader together.
A PC for this program can be either a laptop type or a desktop computer with the least requirement for configurations.
Something you should be aware
It's quite rare nowadays to see an earlier edition of Ender 3 with an 8-bit mother board, but you should check in advance; if the Ender 3 in your hand is this older edition, you can use a mini USB cable instead (not widely used today).
Step by Step to Connect Ender 3 to PC
1. Connect Ender 3 to PC via micro USB cable
This step is easy to go. A micro USB cable has two different ends. Just plug in the micro USB end of the cable into the Micro USB port of your Ender 3 and then plug in the USB end of the cable into your PC.
2. Install 3D printer driver on your PC
Usually, when Ender 3 is connected to your PC. The PC, especially the one with a newer operation system like the Windows 10, will automatically install the printer driver software.
If you have a PC with older operation system that won't install driver automatically, then you have to do it on your own.
The Arduino and CH340/CH341 drivers are two options we can try here.
For detailed installation guidance, you can read this article: https://www.geogebra.org/m/hxhz33bg
3. Install slicer software
To send g-code files or give commends from the PC to control and print on your Ender 3, a slicer software like Repetier Host or Cura is needed to install onto your PC. Or you can install the slicing software come within the SD card.
To install Cura or Repetier Host onto your PC, you can directly visit their websites and download installation files, and complete the installation according to the instructions step by step.
In comparison, Cura is more commonly used with simple features and functions, while the Repetier Host has paid option for advanced features and functions.
4. Add Ender 3 to the slicer software
After installation of a slicer software, you need to add your Ender 3 to it. Here, we'll show how to add the Ender 3 to Cura.
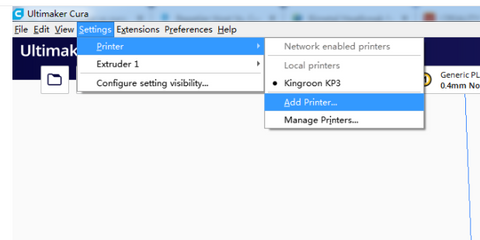
Add your Ender 3 on Cura:
Step 1. click on "Settings" - "Printer" - "Local printers"
Step 2. Select your Ender 3 auto detected by Cura.
5. 3D printing via PC
Now, your Ender 3 is successfully connected to your PC and added to the slicer software. The left steps to do 3D printing on your Ender 3 via PC can be easy.
Taking Cura for example, you can click on "File" - "Open File(s)" and select the file to print, and then select "Print" rather than "Export" (which will export the file to an SD card).
Issues of 3D printing via PC
When perform 3D printing via PC either on a Ender 3 or any other 3D printer, some issues can occur and we should know in advance to prevent these issues from happening.
1. PC become overheated
When print a large object which will last long long time, your PC constantly connects to an output device and long time operation accumulates heat. This will lead heat dissipation problem. Make sure your PC is well ventilated with enough air flow to cool down.
2. Disable sleep mode for your PC
Check if your PC have a sleep mode; if so, don't forget to disable it. When your PC turns into sleep mode, it can pause your print.
3. Shut down background programs
Other background programs, especially gaming or message app, can pop up and interrupt your print. The best way to prevent it from happening is to shut down all background programs.
4. Use backup battery pack
3D print via PC doesn't support print resuming function, thus an unexpected power outage can be fatal to your print and waste your filament. Connecting your printer and PC to a backup battery pack is always a good option if you're going to large objects or very long time.
5. Don't plug in other device via printing
Plugging in other device like a cell phone can pop out a new window on your PC. This will also interrupt your print. So, never plug in any other device while printing on your PC.
6. Use longer USB cable if needed
Short USB cable connected to PC means too close distance between the printer and your PC. Sometimes it will lead to overheat of your PC (heat dissipates from the printer) or inconvenient operation. Using a longer USB cable (instead of the original one come with the printer) can help you out.