Klipper Timelapse - Manual Installation and Error Fix
Recently we released a new tutorial on Klipper timelapse, Klipper Timelapse - Installation and Configuration, and people reported some problems and issues about that. In this article we are going to show you how to fix them and make the timelapse work on your KINGROON KLP1, KP3S Pro V2, or even some other Klipper printers.
We must warn you before everything, messing around with the stock system may cause the warranty loss or system corruption, it is under your risk. We hope everyone proceed the following steps after knowing that. If you are not familiar with the Linux system, we remain the stock system will keep your warranty fine.
If you have anything wrong with the current system or it is totally corrupted, you can always fix it by flashing the stock image. How to Falsh the EMMC Chip on Kingroon KP3S Pro V2
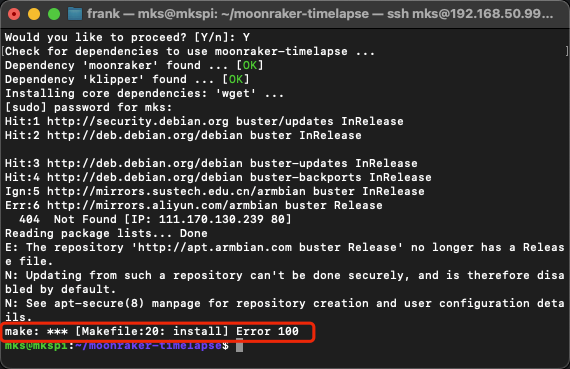
The “make: *** [Makefile:20: install] Error 100”
If you get the “make: *** [Makefile:20: install] Error 100“ issue, that means internet issues or the Linux release is no longer be supported by the moonraker timelapse and you need to install everything manually.
Things you need
The Manually Installation Kit: https://drive.google.com/drive/folders/1iEikUAXxpPUsf-k9LkMB7PGEHAR9ETJC?usp=sharing
The MobaXterm: https://mobaxterm.mobatek.net/download-home-edition.html
Filezilla: https://filezilla-project.org/
For Windows users, use The MobaXterm, Mac users use Fillezilla. Then you need to put the files in to the correct folders.
Adding files
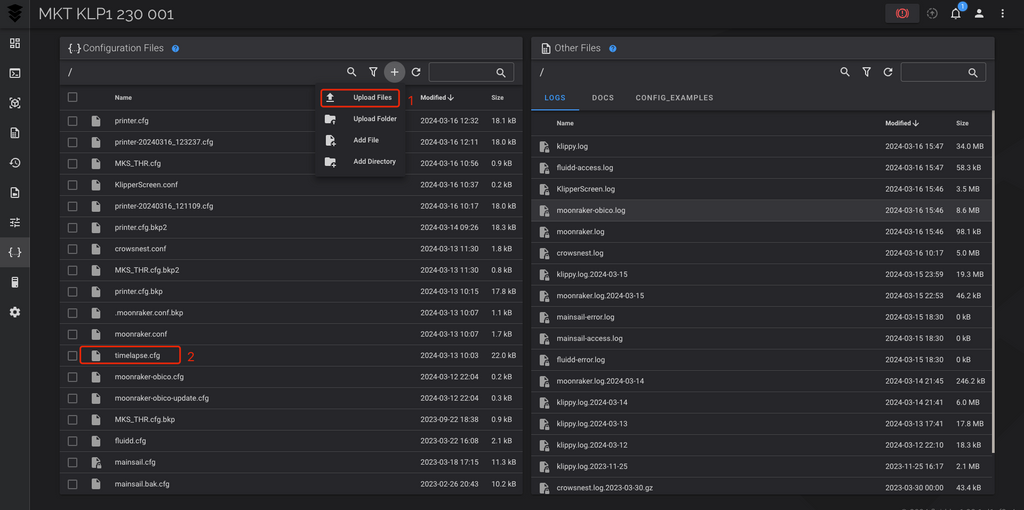
First, use The MobaXterm or Filezilla to connect the printer system, then locate to “/home/mks/moonraker/moonraker/components”, put “timelapse.py” in it.

After that, go to Klipper dashboard and upload “timelapse.cfg” into the configuration files. Then you have all the required files added.
Change Configurations
Then open the “moonraker.cfg” and add the timelapse settings from the “README” file at the end.
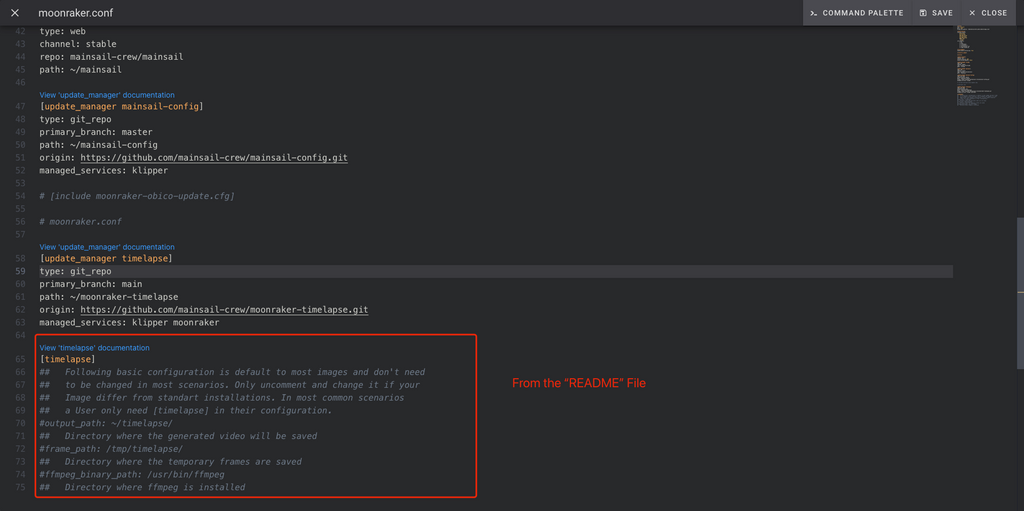
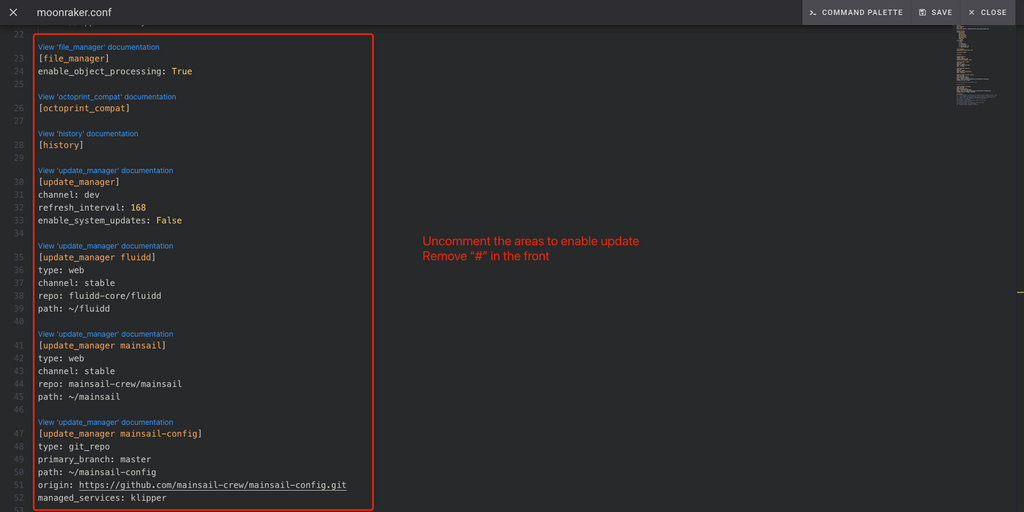
After that, uncomment the areas by removing “#” to enable update.
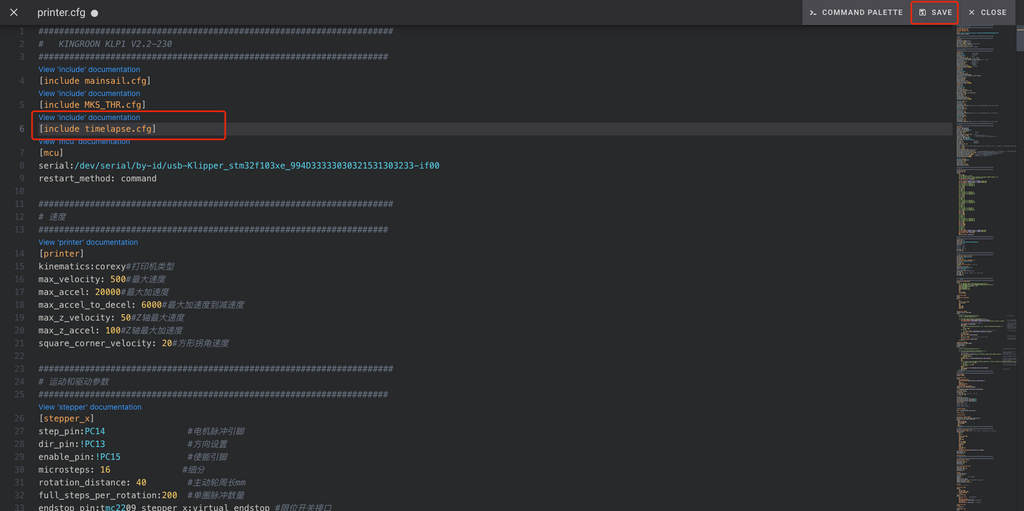
Open the “printer.cfg”, add “[include MKS_THR.cfg]” to enable timelapse.
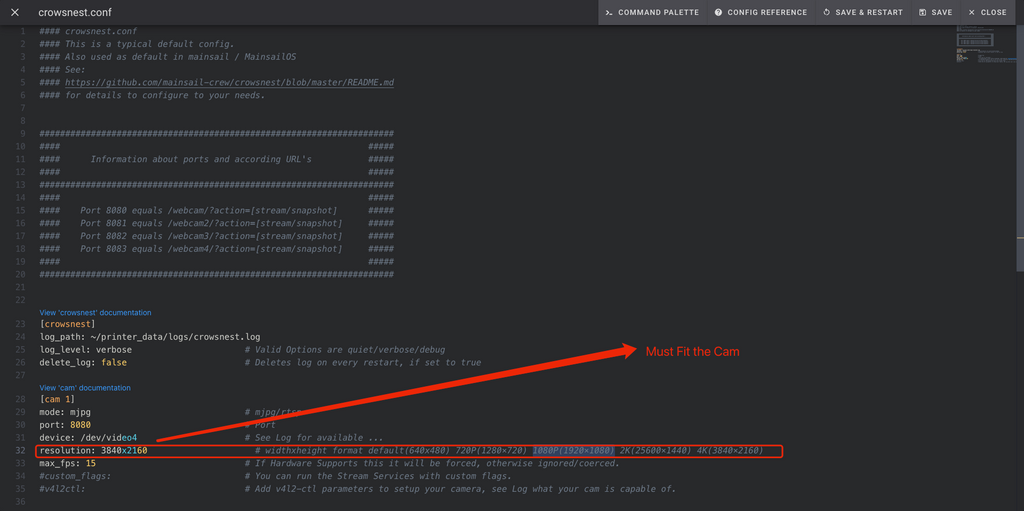
Then you are almost ready with the configuration. If you are using the KLP1 Cam or any other webcam that supports higher resolution, you might want to change the default settings to achieve better results. After all, it is quite low quality for the default 640x480.
So, you need to go to “crowsnest.conf” and change the resolution to fit your camera. According to our testing, the 4K resolution is OK for monitoring and might also supported by the Klipper Timelapse. For those who bought the KLP1 Cam from https://kingroon.com/, your camera is 1080P.
OK, the configuration is all set, you can update the Fluidd for the next step.
Update Fluidd and Set up the Rest
Since you have enabled the system update in the previous step, you can find “system update” in “settings”. Fluidd should have update now, you can click “update” after it. Wait for its finish, once you see “UP TO DATE”, you are all set.
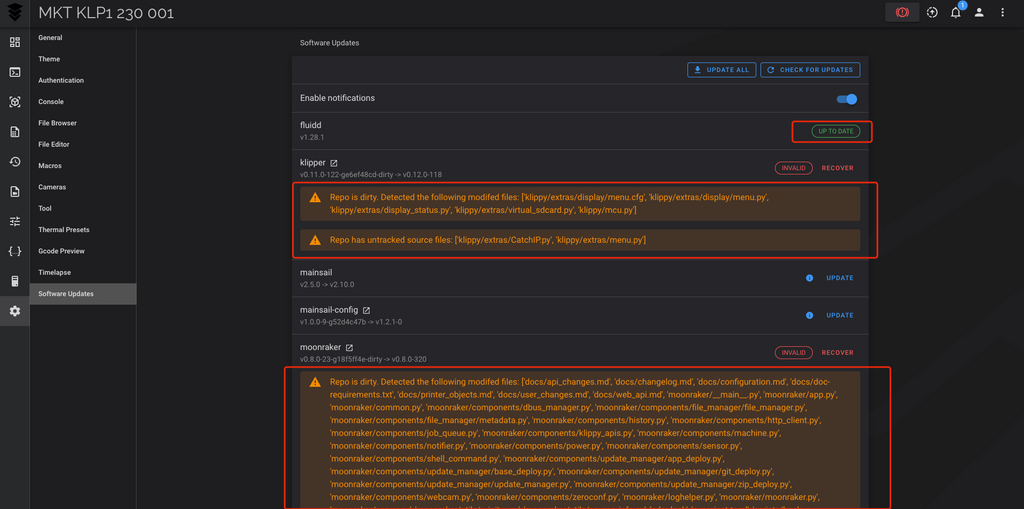
Ignore the errors, it doesn’t matter and won’t affect anything, updating Fluidd is all you need. Reboot the printer to have everything activated.
Turn on the Timelapse Features
The time lapse feature is off by default, you need to turn it on and modify the Slicer settings to make it work.
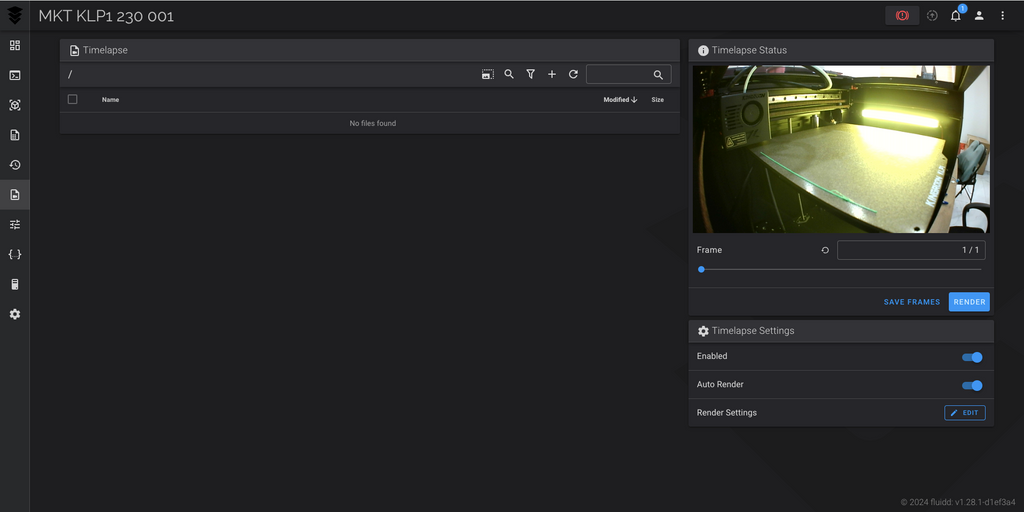
First, go to “Settings/timelapse” ,make sure the camera has been selected and set up the Timelapse function. The following settings are for the KLP1 Cam, you can buy it on our official website.
For those who are using the different cameras, please change the “Park Position” to have the best pictures.

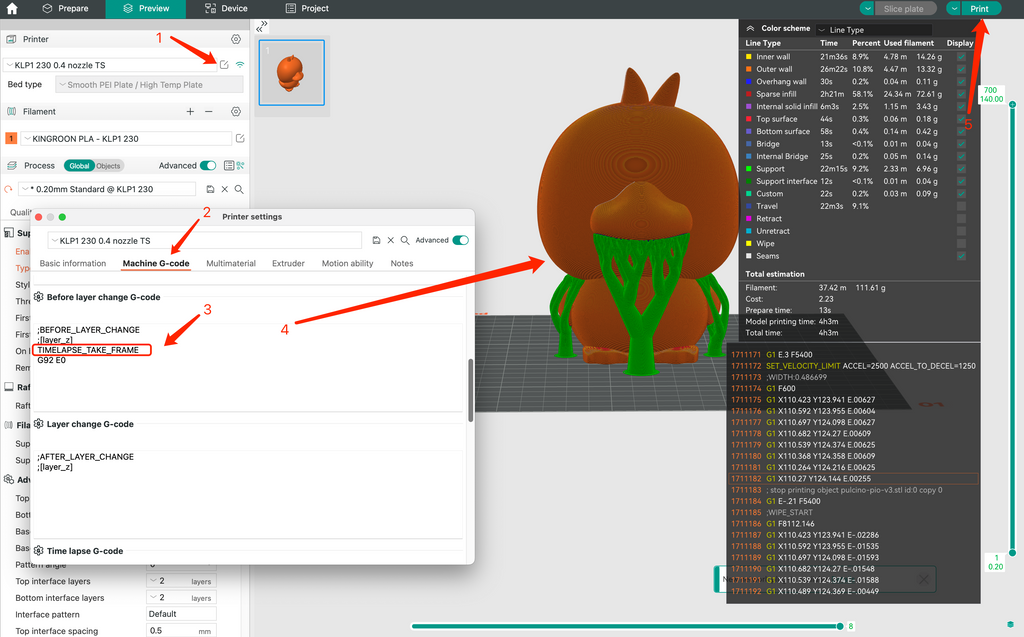
After that, open the OrcaSlicer, click edit button after the nozzle settings, then add “TIMELAPSE_TAKE_FRAME” in the “Before layer change g-code”. Then every print you sliced is under time lapse as long as you turn it on in the Klipper dashboard.
Since time lapse prints are easier to get stringing issue, you might want keep a backup nozzle setting for normal prints, then optimize the time lapse one.
If you prefer to use Cura, Klipper Timelapse - Installation and Configuration will show you how.
Check and Test
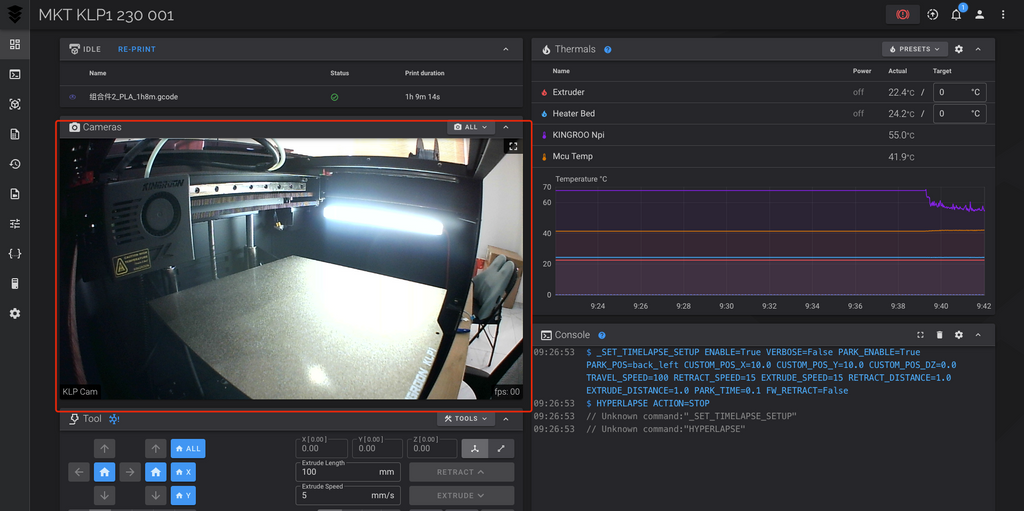
Now you are ready for your first time lapse print. Go to “Timelapse” field. The system should start to take photos since the print begins. Once you see the picture on the right side, you are all set.
If is not, go check the Fluidd version, then check the camera settings to fix it. In this situation, the camera might not work in the front page either. Then you can check with the below list:
Fluidd Version: It has to be up to date
Resolution Settings in “crowsnest.conf”: It must fit your camera and cannot with any mistype.
Time Lapse Settings: The related camera must be selected
Camera Settings: Delete the Camera, then add it again
Reboot: Some configuration settings must be activated after rebooting the printer
Once the problem has been fixed, you should be able to see it in the front page.
To make sure the video been rendered successfully, please make sure to have the light on and Keep the camera stable.
You can also enable “save frames” to keep the chance to do any modifications.
Once a print is done, a time lapse video will be rendered automatically, and you will see it in the list, you can click to watch it and download it.

Since the default EMMC module is only 8GB in storage. You might want to check 32GB EMMC Module Comes, what it is for and what Can we Do with it and try the 32GB EMMC module.
If you happen to install Obico on your printer, then don’t forget to get the timelapse video in another mode, it generates videos for every time. You can find them in “print history”.
Comments
Leave a comment