Klipper is a 3D printer firmware. It helps your 3D printers to print faster and better. Today we are going to talk about how to prepare Klipper firmware for Kingroon KP3S 3.0 3D printer by using Fluiddpi.
* Please be noted the tutorial only applys to Kingroon KP3S with MCU STM32 F103 mainboard and MCU GD32F303 mainboard. The Kingroon KP3S with MCU STM32F407 version of mainboard does NOT apply to this tutorial.
Get Kingroon KP3S Mianbord with Klipper firmware flashed HERE.

To use Klipper, we need the help of Fluiddpi, it’s a powerful project like Octopi. It contains Klipper in its image, so you don’t have to download and install it from the beginning. Of course, we will show you a better plan on Kliiper soon, which is how to use it on Octopi. You can get all the information you need on docs.fluidd.xyz.

Step 1 - Flash Fluiddpi
First, visit https://github.com/cadriel/FluiddPI/releases/latest to download the latest Fluiddpi image.

Once you finished, use the Raspberry Pi Imager to flash it. Click “Choose OS”, scroll to the bottom, select “Use custom”, then choose the file you just downloaded. Then press keys to preset wifi(On Windows control shift x. On Mac comand shift x). If you don’t know how, please check our last tutorial on how to set up Octopi to print on your KP3S. Please enable ssh and remember the password. And the WIFI signal cannot be 5G.
After flashing the image, you can set your Pi up, our last tutorial will show you how. If you have an extra SD card, you can switch between Octopi and Fluiddpi, all you need to do is changing the SD card.
Step 2 - Update Fluiddpi
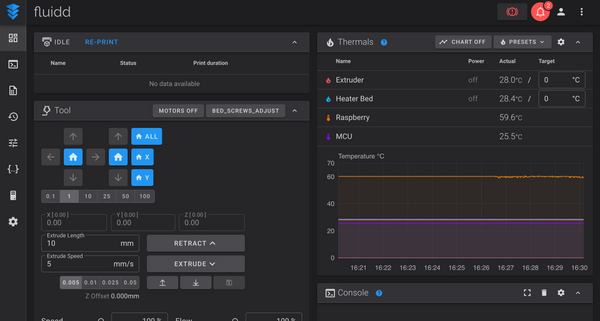
Power up the pi, wait for a while, then visit http://fluiddpi.local to go to Fluiddpi’s dashboard. Please make sure your computer and pi are at the same network. If you don’t have a WIFI adapter, you can use cable network to instead.

Scroll down to the bottom, click the gear icon, update everything to the latest, it will take some time.
Since Klipper has changed its configure rules recently, the old “printer.cfg” files you download is no longer working. So we will use the latest Klipper as a start, and next time we will show you how to config this version to print.
Step 3 - Prepare Klipper Firmware
Once you finished, proceed to the next step. Open terminal on your computer, enter following commands.
ssh pi@fluiddpi.local

If this doesn’t work, you need to go find out the Pi’s IP address and use that instead of “fluiddpi.local”. For example, ssh pi@192.168.50.177. Then you need to enter the SSH password.
After that enter the following command to config the firmware.
Mac Users:
cd ~/klipper/
export LC_ALL=en_GB.UTF-8
make menuconfig
Windows Users:
cd ~/klipper/
make menuconfig
Then you will enter the config settings. Here are what you need to do:
1.Enable extra low-level configuration options
2.Set the Bootloader offeset as 28 KiB
3.Set the “Micro-controller Architecture” as “STMicroelectronics STM32”
4.Set the Communication interface as “USART3 PB11/PB10”
5.Enter the last option, enter “!PC6, !PD13”, the. Press enter key
Then press Q and enter “yes”, after that, the setup is done.

After that, enter “make” to build the firmware. It will take some time. Once you see “klipper.bin”, you’re successful. Then enter the rest two commands to finish this step.
/scripts/update_mks_robin.py ./out/klipper.bin ./out/Robin_nano.bin
cp out/Robin_nano.bin ~/fluidd/

Next, go to the browser, visit “http://fluiddpi.local/Robin_nano.bin” . You will get a bin file, put it into the SD card. You are ready to flash the Klipper firmware to Kingroon KP3S 3D printer.

Step 4 - Flash Klipper Firmware
Put the SD Card into KP3S, turn it on, the firmware should start to flash. Once you see “100%”, you are all set. Now you are ready to use Klipper Firmware on Kingroon KP3S. We will show you guys how to config Klipper to print on the coming blogs.
After that, connect the printer with raspberry. Then go to the Terminal, enter below command.
ssh pi@fluiddpi.local
(Then enter password to login)
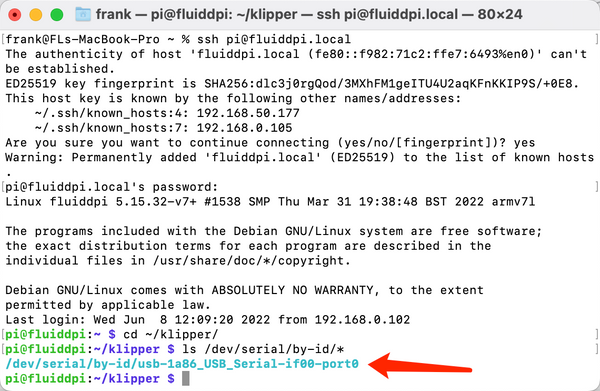
cd ~/klipper/
ls /dev/serial/by-id/*
Then copy the marked line, paste it to the note, you will use it later.
Step 5, Configuration
Go visit this link and download its file.
https://github.com/nehilo/klipper_KP3S

After that, unzip the file and go to http://fluiddpi.local/#/configure
Upload all the config files.

Since KP3S use a Titan extruder, it is necessary to correct the microsteps from 64 to 32. Click to open the stepper.cfg, rewrite the microsteps to 32.

After that, click “save&restart”.
Next, open the printer.cfg, find the [mcu] area, overwrite the serial with the line we copied on the note. (Ours are /dev/serial/by-id/usb-1a86_USB_Serial-if00-port0)
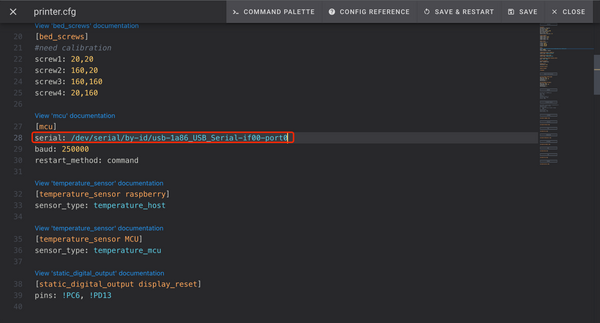
Then click “save&restart”.
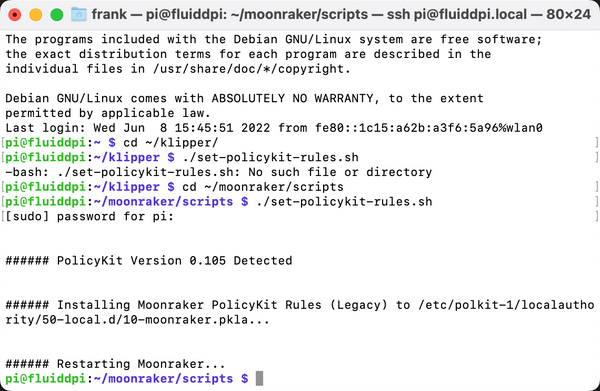
If you get below error.

Enter the following command:
cd ~/moonraker/scripts
./set-policykit-rules.sh
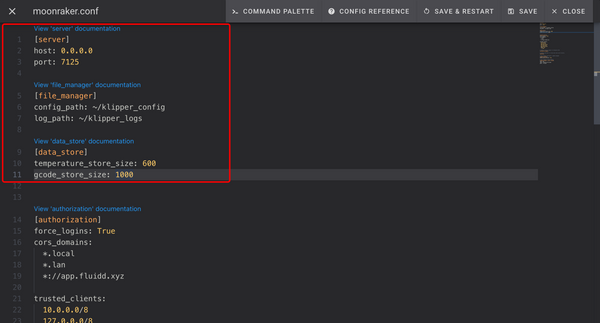
If it is still not working, open “moonraker.conf” and modify the server area as below:
[server]
host: 0.0.0.0
port: 7125
[file_manager]
config_path: ~/klipper_config
log_path: ~/klipper_logs
[data_store]
temperature_store_size: 600
gcode_store_size: 1000
the Orignal look like following:
[server]
host: 0.0.0.0
port: 7125
temperature_store_size: 600
gcode_store_size: 1000
config_path: ~/klipper_config
log_path: ~/klipper_logs
You can find the reference in https://moonraker.readthedocs.io/en/latest/configuration/#option-moved-deprecations

After that, you are all set.
You should revise the downloaded configuration file according to your own situation, for example, whether you're using auto bed leveling or not, or if you're using Klipper screen or not. If you want to save time, you can just download file through below links.
Please be aware that Klipper is a third-party project that may cause warranty loss, you are doing it at your own risk. Please follow the steps and choose the right bundles. Those models don’t share the settings. If you are using different models or different boards, please check https://www.klipper3d.org/ to find more help.
KP3S Klipper Bundles:
https://drive.google.com/drive/folders/1ofdt3cI-jaq-3vhi_M0x7jDb05TNDMH6?usp=sharing
KP5L Klipper Bundles:
https://drive.google.com/drive/folders/1usUqXXuqWOOKNAJOO1SQJdmYKYkSXeEB?usp=sharing
KP5M Klipper Bundles:
https://drive.google.com/drive/folders/1nwKD_oI6Vh5pbRGr2isVEDNofsdcVhZM?usp=sharing
KP3S Pro Klipper Bundles:
https://drive.google.com/drive/folders/1wlxhkYVkU_tr-NuFbUkt7umakp2xaN5K?usp=sharing
Orange Pi Zero 2 Klipper Bundles(Tutorial Available Soon):
https://drive.google.com/drive/folders/1ZK4M_jXE4-4-cLwCiCDr9w8sy6MrX7j3?usp=sharing
Also, you can watch this video and learn Klipper configuration set-up for Kingroon KP3S 3D printer.
Next, we are going to publish further settings and show you what Klipper can do.
Is there any different of config file between kp3s pro and kp3s pro s1?
If anyone has this error:
Unable to read tmc uart ‘stepper_x’ register IFCNT
on a KP3s (no pro, just stock)
just go to your printer cfg and disable the tmc section
Please add STM32F407 Klipper Firmware
So, after set everything right, I’m getting the following error:
Unable to read tmc uart ‘stepper_x’ register IFCNT
Once the underlying issue is corrected, use the
“FIRMWARE_RESTART” command to reset the firmware, reload the
config, and restart the host software.
Printer is shutdown
It happens everytime. Any clue on how to solve this?
@Jacson
This works for me
#####################################
BLtouch ###################################### [include bltouch.cfg]
[safe_z_home] # enable for BLTouch
home_xy_position: 70,90
speed: 50
z_hop: 10
z_hop_speed: 15
[bltouch] # enable for BLTouch
probe_with_touch_mode: True # for original BLTouch v 3.0sensor_pin: ^PA11
control_pin: PA8
x_offset: 30
y_offset: 3
#z_offset: 3.873750
speed: 10
[bed_mesh] # enable for BLTouch
speed: 120
mesh_min: 30, 23
mesh_max: 180, 180
horizontal_move_z: 5
algorithm: bicubic
probe_count: 6,6