 United States (USD $)
 Российская (RUB ₽)
 Global (USD $)

The OrcaSlicer Device Tab is a useful feature that enables you manage your 3D printer straight from your slicer. Just imagine, the printer’s control panel is right there in your slicer!

No more switching browsers and windows, uploading files manually or monitoring print status on another screen. With the Device Tab, you can have a look at a camera image of your printer, monitor its progress and launch or terminate printing directly via OrcaSlicer. That makes for much smoother and efficient printing experience.
The Device Tab works with popular printer control platforms and web interfaces like OctoPrint, Mainsail, Fluidd, and Obico. When you connect your 3D printer to OrcaSlicer using the device tab feature you get benefited from all the features of these tools from inside slicer with just one click.
In this article we will go through the features of device tap in OrcaSlicer, what is it? why connecting your 3D printer through the device tab could be beneficial for you? And how to connect your 3D printer through the device tap.
Let’s start!
What is the device tap in OrcaSlicer?
The Device Tab in OrcaSlicer is an integrated window inside the slicer which lets you control your 3D printer directly from the OrcaSlicer. It works with popular printer control systems like OctoPrint, Mainsail, Fluidd, PrusaLink, PrusaConnect, Duet, FlashAir, AstroBox, Repetier, MKS, FlashForge, SimplyPrint and Obico.
With this feature, you can see your printer's camera, check its status, start or stop prints, send files and get access of all these system features without switching to another program or open your web browser. This makes managing your 3D printing easier and more convenient.
Benefits of Connecting Your 3D Printer through the Device Tab
One fundamental advantage is centralized control which removes inconsistency caused by shifting between different software or online interfaces within which a printer is managed. This unification makes printing more efficient and easier to execute.
Additionally, one can easily look into the camera live stream from OrcaSlicer and track his prints’ progress then slice again or tweak specific settings in slicing. This helps you identify any problem with the printing fast enough for fixing it before creating new sliced files.
The ability to start, stop, and monitor prints from within the slicer is another convenience offered by the Device Tab. It helps you streamline your workflow, save time and minimize errors.
You can also send files directly from your slicer to your printer to start with one click, saving you a lot of time.
Top of Form
Top of Form
How to connect your 3D printer through the device tap?
In this part of article, we will connect Kingroon KP3S PRO V2 as our 3D printer which comes with pre-installed Klipper, to OrcaSlicer through the device tap feature using Octo/Klipper option.
Kingroon KP3S Pro V2 is a very fast and reliable 3dprinter; it is equipped with linear rail guides on all axis which allows it to reach high speeds of 350mm/s.

If you are more curious about this printer, please visit the official website by clicking here.
We will also learn together the steps on how to connect Obico, a famous 3D printing platform for remote control, to OrcaSicer via the device tap option to control our 3D printer remotely from anywhere in the world!

With Obico, you can monitor and control your 3D printer from any device and anywhere. You can also relax with Obico's AI failure detection system that keeps an eye on your print and notifies you of any issues. You will enjoy unlimited webcam streaming, 3D printer status notifications, 3D printer remote access and much more!
Connecting Kingroon KP3S PRO V2 to OrcaSlicer using Octo/Klipper option
To connect your Klipper 3D printer to OrcaSlicer via the Device tap feature and get access to your Klipper web interface though your slicer. Follow these simple steps below!
Step 1: Download and Install OrcaSlicer
You can download OrcaSlicer from its GitHub page: OrcaSlicer GitHub. Follow the instructions to install it on your computer.
Step 2: Choose Your Printer and Filament
Open OrcaSlicer and select the printer and filament. You can use the default profiles that come with the software, or create your own custom profiles if you want to print with different settings.
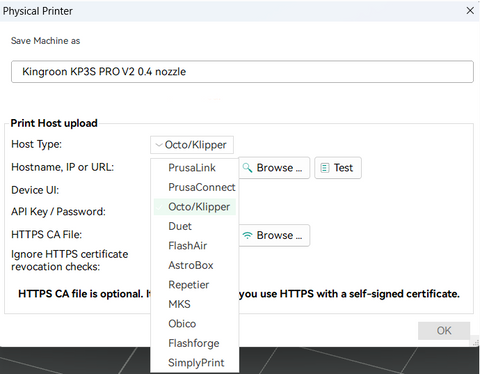
Step 3: Open printer connection window and enter your 3D printer IP
You can open your 3D printer connection window by clicking on the connection icon that appears besides your printer’s name in OrcaSlicer window.

In the new window, set the host type to be: Octo/Klipper as we use our Kingroon KP3S PRO V2 with Klipper firmware.

In the Hostname, IP or URL field enter your 3D printer's IP; it can be found under network settings on your printer's screen.
Then click on OK to finish.
And well done! 🚀 You now have connected your 3D printer to OrcaSlicer. You can click on the device tap to open your Klipper web interface and manage your printer remotely from the same window in OrcaSlicer without need to open separate web browser.

Note:
As we see in the image above, the Kingroon KP3S PRO V2 comes with pre-installed Fluidd web interface.
Connecting Kingroon KP3S PRO V2 to OrcaSlicer using Obico option
To connect your Kingroon KP3S PRO V2 printer to OrcaSlicer via the Device tap and get access to Obico interface though your slicer. Follow these following easy steps!
- Open OrcaSlicer and Printer Settings:
- Launch OrcaSlicer on your computer.
- In the "Prepare" tab, click the connectionicon next to the printer dropdown menu.
- Select Obico as Host Type:
- In the dropdown for ‘Host Type’ select ‘Obico’.
- Ensure that hostname is set to https://app.obico.io, which should be the default.

- Test the Connection:
- Click on ‘Login/Test’ button; this will prompt you to log in using your Obico account.
- Log in with your Obico account credentials in popup browser window – if you do not have an account yet and did not install Obico on your printer, sign up and follow instructions for Obico installation setup with Klipper.

- Authorize OrcaSlicer:
- After logging in, click "Authorize" to grant OrcaSlicer the necessary permissions.
- The API Key field should fill itself automatically; do not input key manually.


- Refresh Printers:
- Click ‘Refresh Printers’ so that it loads up printer list from Obico.
- If you have multiple printers then choose Kingroon KP3S PRO V2 (or as you named it) from drop down list.

- Verify Device UI Field:
- Make sure that ‘Device UI’ field is auto-filled -this connects user interface of printer with orcaslicr .
- Click on “OK” to finish

With these steps, you have successfully connected your Kingroon KP3S PRO V2 to OrcaSlicer using the Obico option. You can now access your Obico interface trough the device tap and enjoy a more streamlined and efficient 3D printing experience!
Benefits of Using Obico with OrcaSlicer
- Remote Monitoring and Control:
Access your 3D printer remotely through slicer interface without having to open another window or web browser.
- AI Failure Detection:
Obico’s AI system monitors prints for any issues and alerts users, reducing number of failed prints drastically.
- Unlimited Webcam Streaming:
Stream camera feed from printer continuously with no limits; keep an eye on projects closely!
- Notifications and Alerts:
Get real-time notifications about printer status such as print completion or errors occurring during printing process.
- Enhanced Workflow:
By integrating these features directly into OrcaSlicer, you can save time as well as minimize errors which makes the whole printing process much efficient and user friendly.
FAQs
- Q: What does the OrcaSlicer Device Tab do?
The OrcaSlicer Device Tab is a feature in the OrcaSlicer software that enables one to manage their 3D printer directly from it. It puts a control panel within the slicer (Web interface), so there’s no need to switch programs or browser windows.
- Q: Which 3D printers work with the Device Tab?
The Device Tab supports multiple 3D printers which come pre-configured with different popular printer control systems like OctoPrint, Mainsail, Fluidd, PrusaLink, PrusaConnect, Duet, FlashAir, AstroBox, Repetier, MKS, FlashForge, SimplyPrint and Obico
- Q: How can my 3D printing workflow be improved by the Device Tab?
By making everything available at a place – OrcaSlicer itself – the centralization brought by this feature allows monitoring of print progress, viewing camera feeds as well as starting/stopping prints and sending files to your printer hence saving time throughout this process.
- Q: Does anything limit usage of the Device Tab?
While the Device Tab offers many benefits, it's important to note that it relies on a stable internet connection (for some connecting options) and compatibility with your printer's control system. Some features may also depend on the specific capabilities of your printer.
Conclusion
The Device Tab of the OrcaSlicer is a great feature to have when 3D printing because it lets you control and monitor everything from the slicer itself. Instead of needing to use multiple pieces of software or interfaces, connecting your printer through the device tab gives you access to more web interface functions such as live camera feeds; print status monitoring; and controlling prints. This cuts down on time spent managing workflows while also making it easier for users at any level with identifying problems or finding fixes for their prints. So if you want an even better experience with 3D printing, whether new or old, give this feature in OrcaSlicer a try!


