Country Selector
USA Flag United States (USD $) ⌄
RU Flag Российская (RUB ₽) Global Flag Global (USD $)
Kingroon 3D
Cart 0
  • Home
  • 🔥Kingroon 9th Flash Deals
  • Filaments
    • TPU/ Dual / Tri-Color Silk PLA Filament ⚡2KG⚡
    • 🔥3D Resin ⚡$19.99/2000g⚡
    • PLA Filament ⚡$9.9/1KG⚡
    • PETG Filament ⚡$9.9/1KG⚡
    • Matte PLA Filament
    • PLA Plus (PLA+)
    • PLA Refill Filament
    • TPU Filament
    • Dual / Tri-Color Silk PLA Filament
    • Rapid PLA Filament
    • Silk PLA Filament
    • Rainbow Silk PLA
    • Carbon fiber filament
    • ABS Filament
    • 3D Printer Resin
  • Accessories
    • All Accessories
    • 3D Printer Nozzle
    • Kingroon KP3S Parts & Accessories
    • Bambu Labs replacement parts and upgrades
    • 3D Printer Tools
  • 3D Printer
    • Kingroon KP3S V1
    • Kingroon KP3S PRO V2
    • Kingroon KP3S 3.0
    • Kingroon KLP1
  • Blogs
    • Trouble Shooting & Tutorials
    • 3D Printing Guides
    • News
    • Downloads
  • Kingroon Filament Guide
My Account
Log in Register
Kingroon 3D
  • Home
  • 🔥Kingroon 9th Flash Deals
  • Filaments
    • TPU/ Dual / Tri-Color Silk PLA Filament ⚡2KG⚡
    • 🔥3D Resin ⚡$19.99/2000g⚡
    • PLA Filament ⚡$9.9/1KG⚡
    • PETG Filament ⚡$9.9/1KG⚡
    • Matte PLA Filament
    • PLA Plus (PLA+)
    • PLA Refill Filament
    • TPU Filament
    • Dual / Tri-Color Silk PLA Filament
    • Rapid PLA Filament
    • Silk PLA Filament
    • Rainbow Silk PLA
    • Carbon fiber filament
    • ABS Filament
    • 3D Printer Resin
  • Accessories
    • All Accessories
    • 3D Printer Nozzle
    • Kingroon KP3S Parts & Accessories
    • Bambu Labs replacement parts and upgrades
    • 3D Printer Tools
  • 3D Printer
    • Kingroon KP3S V1
    • Kingroon KP3S PRO V2
    • Kingroon KP3S 3.0
    • Kingroon KLP1
  • Blogs
    • Trouble Shooting & Tutorials
    • 3D Printing Guides
    • News
    • Downloads
  • Kingroon Filament Guide
Account Cart 0
3D Print 101

How to use 3D Touch on KINGROON KP3S Pro with the Klipper Firmware

by Kingroon 3D on Sep 24, 2023


This tutorial will show you how to use 3D Touch on KINGROON KP3S Pro with the Klipper firmware.

It has been a long time since we released the Klipper configurations of all of our models, running Klipper on a 3D printer make our old friends become powerful and one step further on its printing. Meanwhile, we also released two Klipper models to help people get rid of Raspberry Pi and enjoy the pure, open, and updating Klipper.

Creation and exploration make us makers, we should never stop our steps. Now it’s time to move on auto bed leveling.

If you haven’t use Klipper on your KP3S, KP3S Pro, KP3S Pro S1, KP5M, KP5L, you can check the below link to take your new trip on Klipper.

Klipper Tutorial for KP3S

Once you have the Klipper set up. You can go install the 3D Touch on your printer.


Part 1 Install the 3D Touch
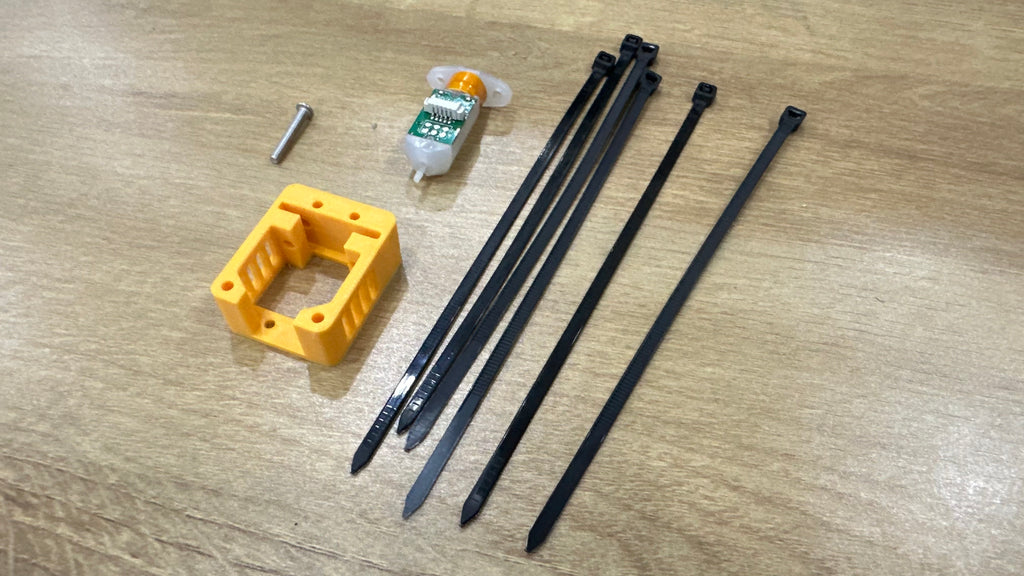
P1 Things for Installing 3D Touch

You will need some screws (m3*16x1, m3*12x2), a 3D Touch/BL Touch, a printed mounter (find it in the below page), some zips.

Use the same way to connect the 3D Touch as the follow link shows

Kingroon KP3S 3D Touch Installation

You will also find the 3D Touch mounter on the page, if you cannot config Klipper, please do not use a different mounter or a BL Touch.

If you haven’t got a 3D Touch, it is available on our site:

https://kingroon.com/products/3d-bltouch-leveling-sensor


Step 1 remove the bottom cover and connect the cables to the mainboard.
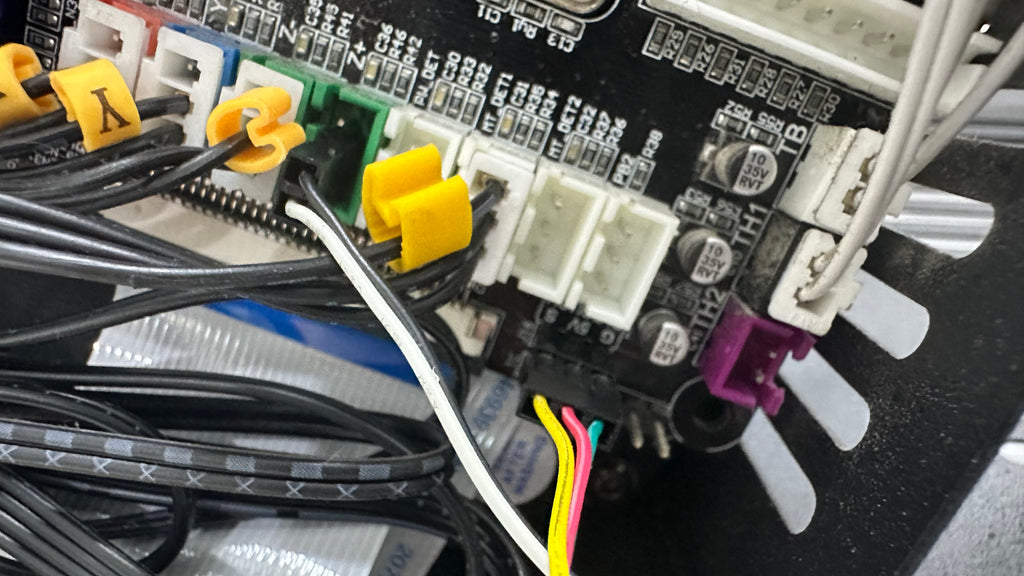
P2 3D Touch connection

If you are using a BL Touch, please check the pins and diagrams for the BL Touch. It might be different.

Step 2 Arrange the 3D Touch cable and tie it.
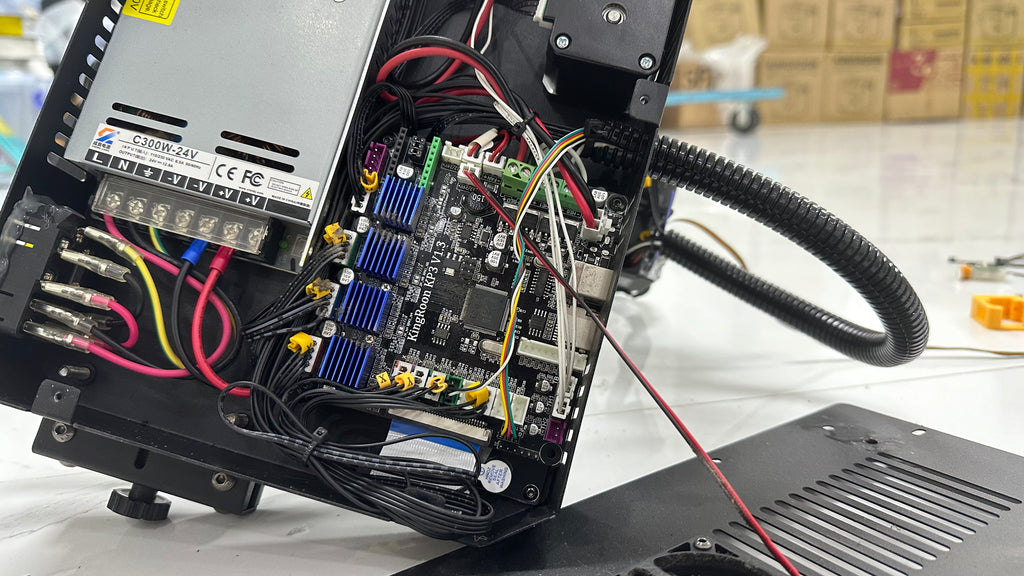
P3 3D Touch Installed

After that, put the bottom cover back and tie the cable with the extruder cable.


Step 3 Use the m3*16 screw to fix the mounter from the inside of the extruder cover, make sure the sensor pin is a little bit lower than the nozzle when it comes out. Then use the m3*12 screws to fix the 3D Touch.
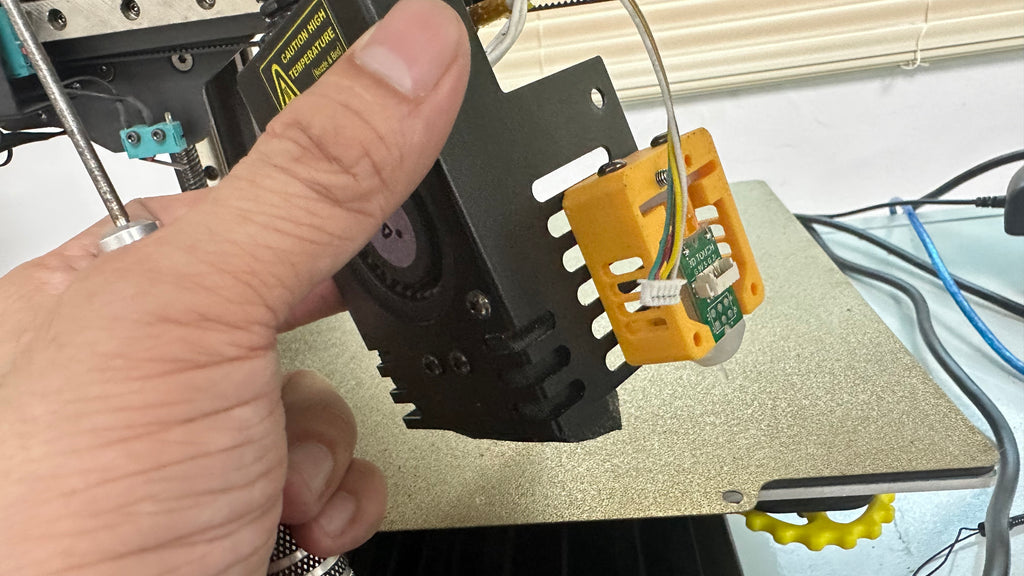
P4 Install the 3D Touch


Step 4 install the extruder back and turn on the printer. The 3D touch should be on Purple light. If it is red, please check its connection.
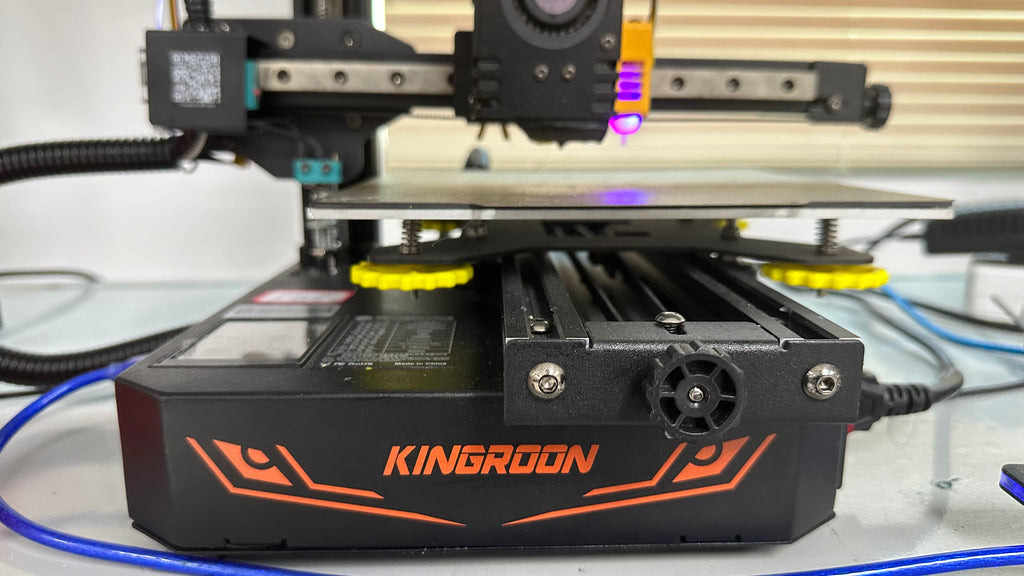
P5 KP3S Pro with the 3D Touch


Part 2 Set up the 3D Touch

After that, you can go set up the 3D Touch in Klipper. Before that, remember to upload the “printer.cfg” to the Klipper configuration and delete repeats. We combined all the settings, so the divided cfg files like “TMC.cfg” is no longer required.


Step 1 Go to the Console field, enter the following commands to check the 3D Touch

Enter “BLTOUCH_DEBUG COMMAND=pin_down” the pin should go out

Enter “BLTOUCH_DEBUG COMMAND=pin_up” the pin should go back in

Then you can do a few more times to make sure it’s working with correct direction. For opposite directions, please replace the 3D Touch with a new one.

Then enter “BLTOUCH_DEBUG COMMAND=touch_mode” to enable “Touch Mode”

After that you can do some pin down and pin up, and check the status by enter “QUERY_PROBE”, seeing “triggered” means it works fine.
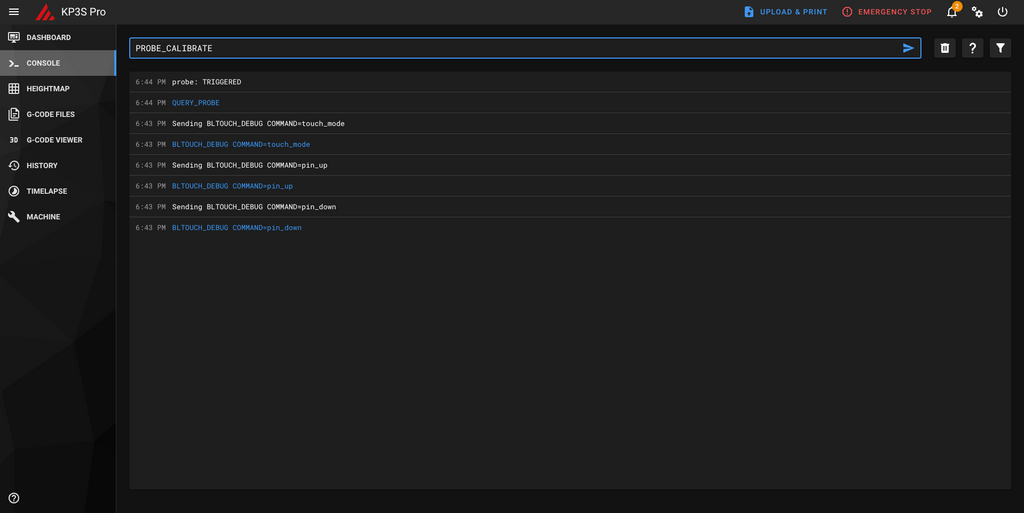
P6 PROBE_CALIBRATE


Step 2 Back to the home page, click “home all”, the printer will start to home all the axis. The printer head will stop on the middle of the heatbed. Then a chart will appear on your screen. To be easy, you can control it with your phone, too.
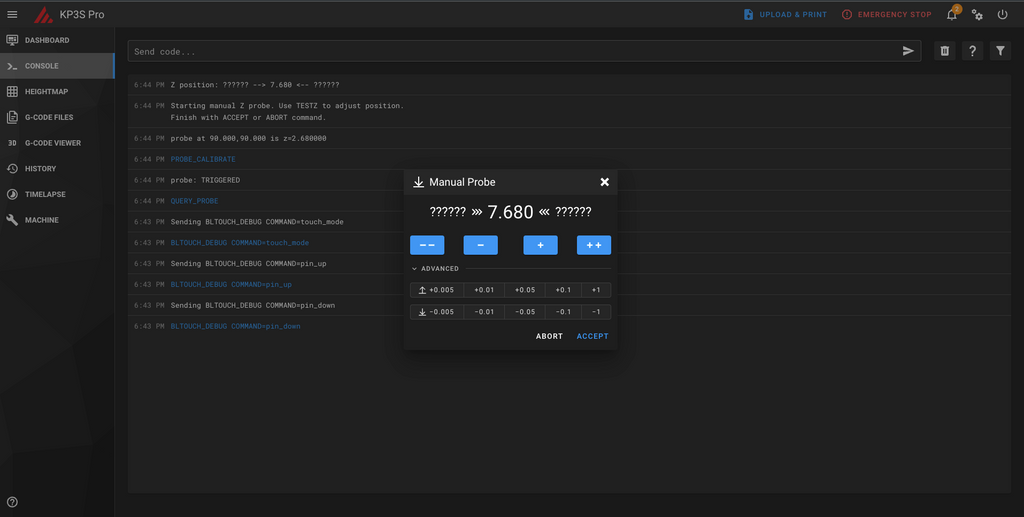
P7 Adjust Z Probe


Step 3 Put a paper under the nozzle, then adjust the extruder up and down to find the correct Z Probe offset. Once you feel a friction when sliding the paper smoothly, click the “ACCEPT” button.
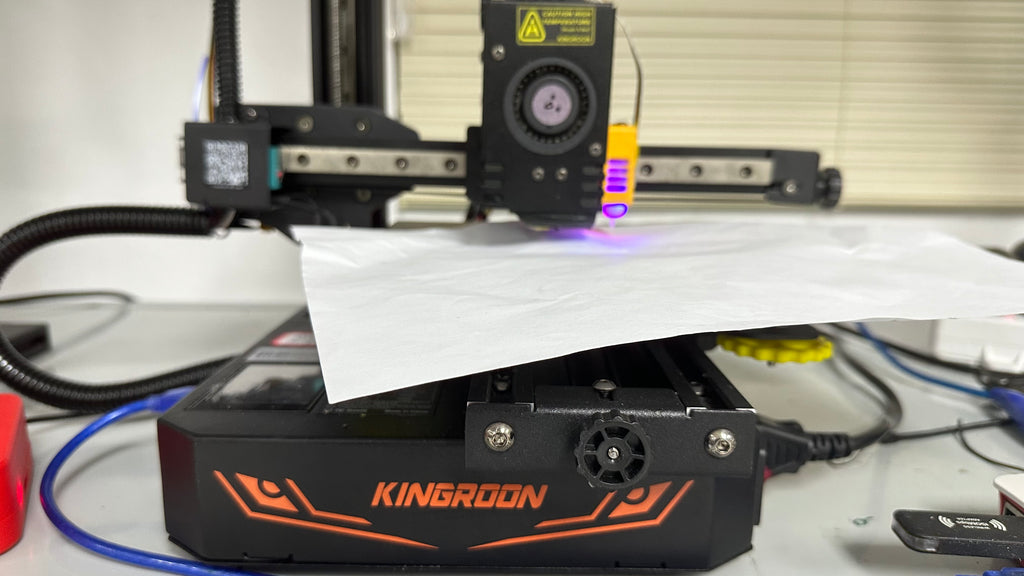
P8 Sliding the Paper for Z Probe Offset


Step 4 Enter “BED_MESH_CALIBRATE”, the bed leveling process should start after that. It will detect 16 points of the bed, then stop at the last point.
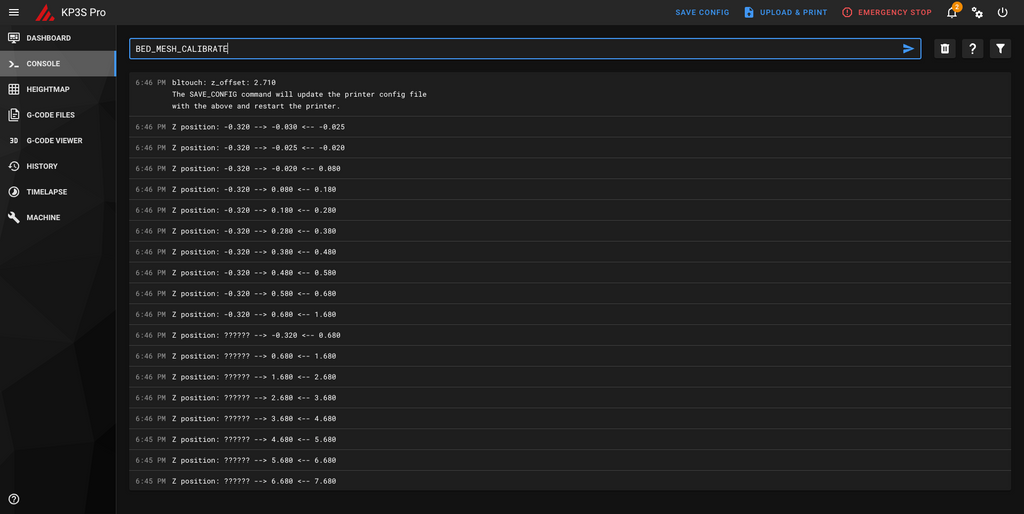
P9 BED_MESH_CALIBRATE


Step 5 Enter “SAVE_CONFIG” to save the bed leveling settings.
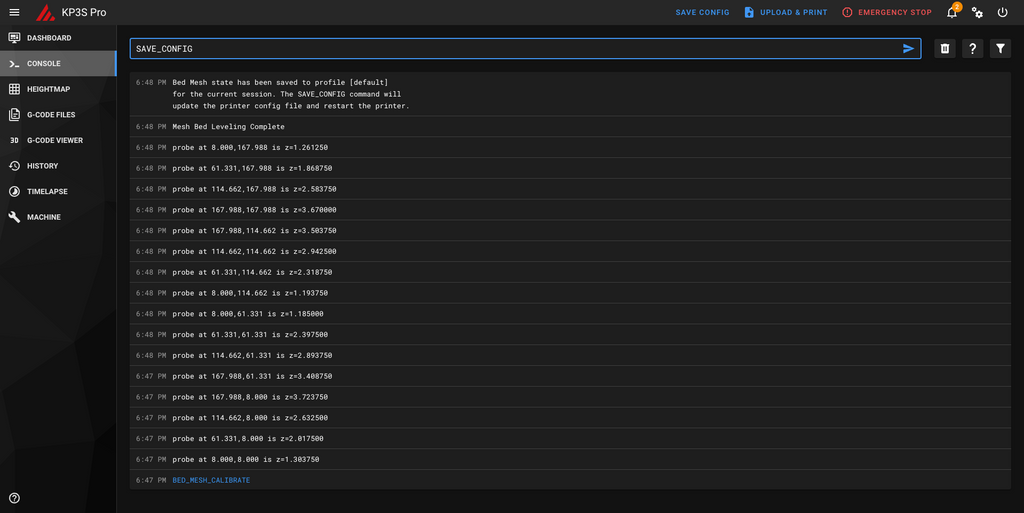
P10 SAVE_CONFIG


Once you see the marked status and Klipper reboots, you are all set.
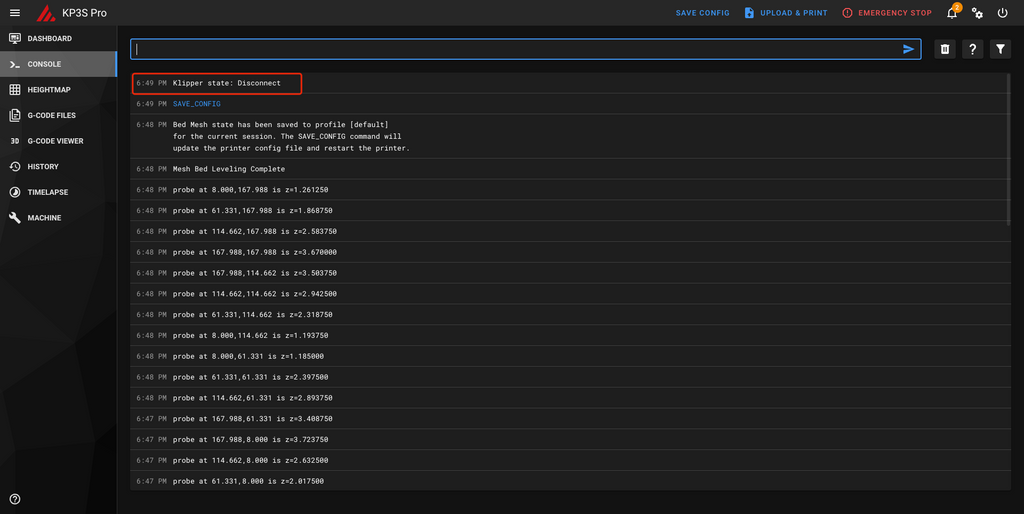
P11 Klipper Restart

Now you can do the printing like normal. Just enjoy the good time of Klipper. More tutorials will come.

KP3S Klipper Configuration

KP3S Pro/KP3S Pro S1 Klipper Configuration

KP5M Klipper Configuration

KP5L Klipper Configuration

Tags: 3d touch, kingroon kp3s bl touch, kingroon kp3s pro, Klipper, Klipper firmware, KP3S BLTouch
Previous
Enable Filament Run Out Detection on Your KINGROON KP3S Pro V2 in 5 Minutes
Next
How to upgrade your KP3S 3D Printer with All metal hotend and CHT Nozzle

Related Articles

Best Nylon 3D Printing Techniques

How to screw into 3d printed parts

Custom Bambu lab Filament Preset, One Step that Make Your Bambu Lab Printers So Much Better

Thermisto for 3D Printer

How to Check and Replace a Faulty Thermisto for 3D Printer

1 comment

  • Eathon
    Apr 11, 2024 at 16:20

    I check the printer.cfg,endstop_pin: !PA11, which means the z-axis is not home by the 3D touch ?

    Reply

Leave a Comment

Your email address will not be published.

PRODUCTS

  • 3D Printers
  • 3D Printer Filament
  • 3D Print Tools
  • 3D Printer Nozzle
  • Help Center

ABOUT US

  • About Kingroon
  • Contact US
  • Recruitment
  • Affiliate Program
  • Blog Posts
  • Author Partners
  • Reseller Program

SUPPORT

  • Tracking Order
  • Shipping Policy
  • Warranty & Returns
  • Payment Method
  • Terms and Conditions
  • Privacy Statement
  • Download Center

FOLLOW US

JOIN US

Sign up for our newsletter and receive $5 coupon your first order

© KINGROON 2024
Visa Mastercard American Express JCB Visa Mastercard American Express JCB Mastercard American Express JCB
Cart 0

Confirm your age

Are you 18 years old or older?

Come back when you're older

Sorry, the content of this store can't be seen by a younger audience. Come back when you're older.

This website uses cookies to ensure you get the best experience on our website. Learn more

Shopping Cart

Your cart is currently empty.
Add note for seller
Subtotal $0.00
  •  
One or more of the items in your cart is a recurring or deferred purchase. By continuing, I agree to the cancellation policy and authorize you to charge my payment method at the prices, frequency and dates listed on this page until my order is fulfilled or I cancel, if permitted.
View Cart

Search our store

Kingroon 3D
Account Cart 0
Popular Searches:
10KG PLA PETG PLA+ KP3S