The KP3S Pro V2 and KLP1 are pure Klipper models who gets regular update like an android phone and getting new features form the Klipper project. Another updating tool, make them more powerful.
The calibration process in OrcaSlicer now seems to be the final puzzle for those two models, it helps to tune your printers one step further and find out the best settings for the materials you use.
If your projects or work has certain requirements for one material like PLA, PETG or ABS, and you purchase them volume from one vender, this process is perfectly for you.
Before start, if you haven’t connected the slicer to the printer, please click to the WIFI icon, enter the IP address of the printer, then click “test”. If successes, click “OK” to save it. You can slice on your PC and print directly now. It even gives you a full Klipper dashboard in the “Device” field.

Part 1, Calibrations
There are a few calibration processes in OrcaSlicer, you should do them by order every time before switching material or material venders.
“Temperature” helps you find out the best printing temperature for your current material.
“Flow Rate” helps you find out the best flow rate by printing two groups of cards, it helps you get the smoothest surface on the prints.
“Pressure Advance” helps to get the perfect pressure advance values by drawing right angles.
“Retraction Test” is helping like its name, reduce the stringing.
“Orca Tolerance Test” is for finding out the filament shrink rate, it makes the prints more accurate and reduce issues. For this test, your better prepare a caliper for a precise measurement.
Once you done all of them, you are ready to print.
The whole process takes about one and a half hour.
Part 2, Temperature Test
Click to the edit button in the “filament” field, add the filament, then check the following settings. The Flow ratio should be 1, the pressure advance should be off, and the shrinkage should be 100%. If you imported our preset, you can do the same adjustment.
After that, go to the “Colling” field. For fan speed of the PLA, we set the min fan speed as 80% and max as 100%, we got it from the PrusaSlicer. Once you finish, you are ready for the test.
Click, Calibration, select temperature, choose the material you want to test. Keep it default and slice directly. Click print, then click upload and print, your printer will run the test automatically.
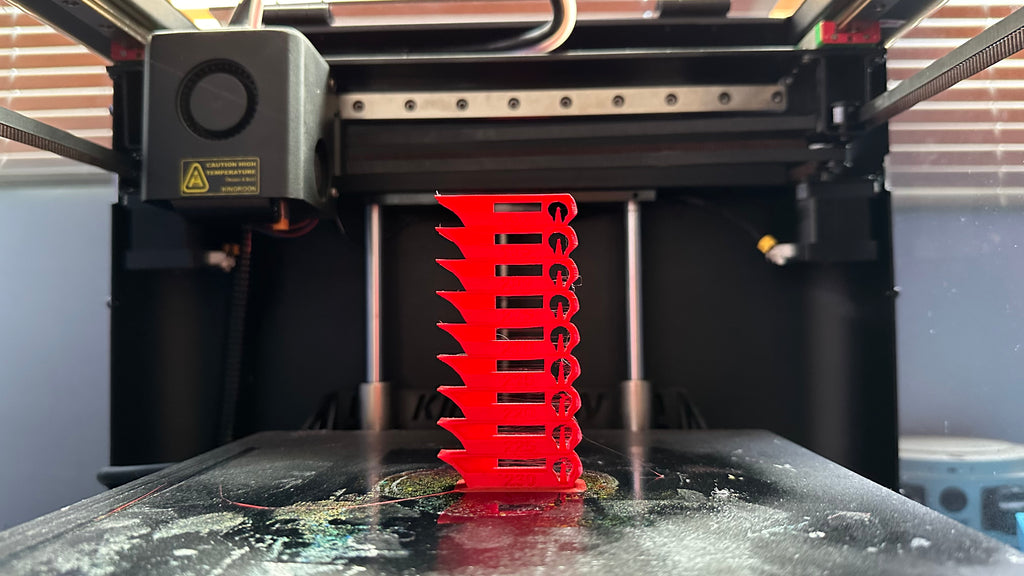
After about 45 minutes, the testing is over. Check the towers carefully, find out the one with best quality. Add 5 ℃ to the result as the max temperature, then the result itself as the min temperature.
For example, we got a 195 ℃ as result, then the max temperature is 200 ℃, the min temperature is 195 ℃, set them as nozzle temperature. The first layer 200 ℃ and the other layers 195 ℃.
Then the temperature is finished.
Part 3, Flow Rate Test
In this test, you need to print two groups of objects to find out the best flow rate. Since it could be a little bit hard to tell, you need to be carefully on picking the results.
Choose “Flow Rate”, then choose “pass 1”. Your current flow rate should be 1 now. “Pass 1” has numbers from 20 to -10 on each object. Print them, then pick the best one as the standard to adjust the current setting.
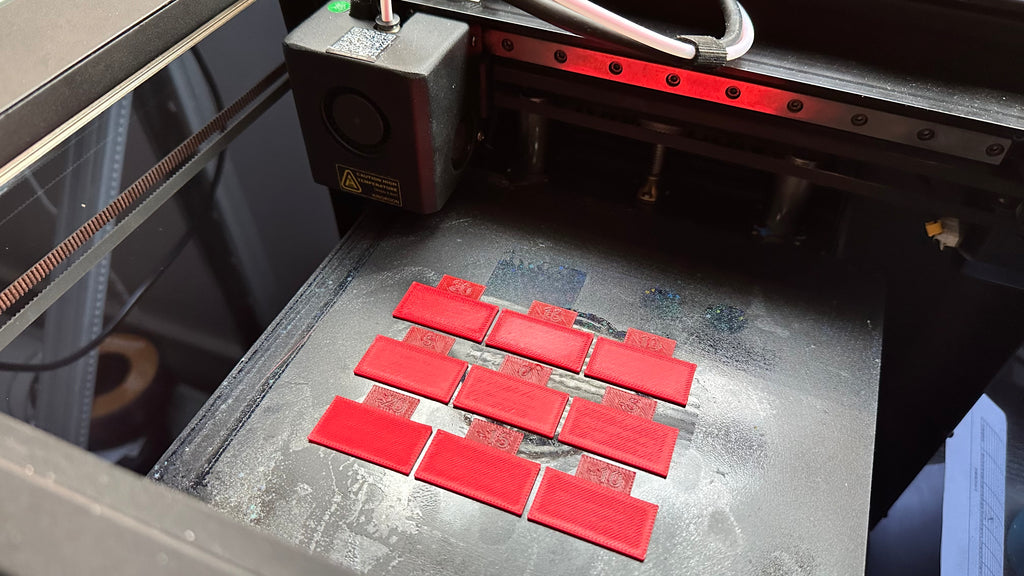
Since the Pass 2 only do reduce, you should add 5 to the results you got. Then add it to the flow ratio.
For example, the best one is 5, then your result should be 1+0.05, which is 1.05.
Then print the pass 2, choose the best one and get the final result.
Let’s take -5 as the result, then your final flow ratio is 1.05(100%-5%) =0.99.
Part 4, Pressure Advance Test
Go to the filament settings, then enable the “Pressure Advance” setting and keep its default settings.
Choose “Pressure Advance”, then choose “DDE” as Extruder type, that’s for the KINGROON KP3S Pro V2, KLP1, and the most of the other KINGROON models. Then change the “End EA” as 0.05.

It’s a short print who takes about 5 minutes. If your printer has a Bowden tube extruder, remember to switch to it.
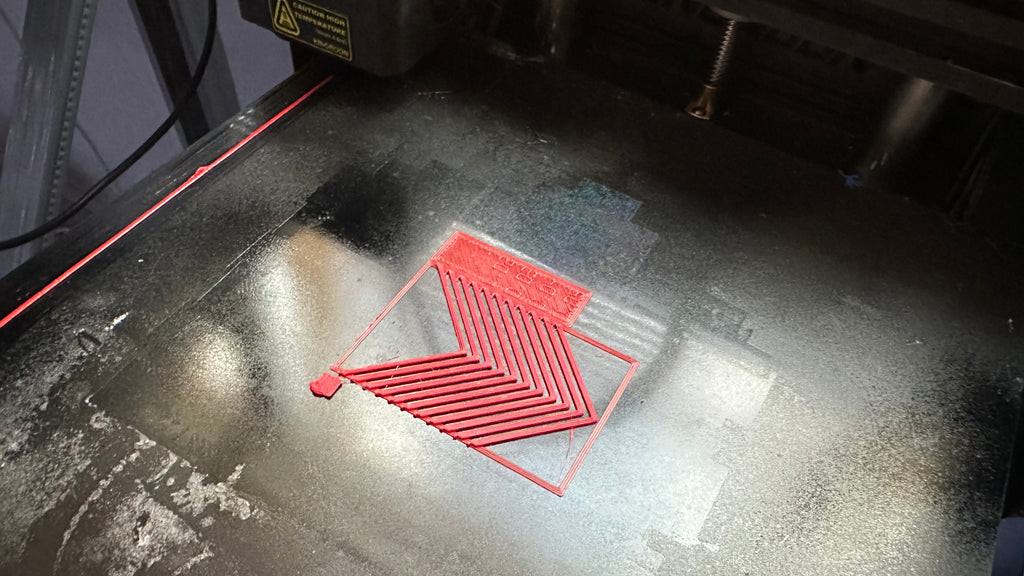
After that, take a carefully look to the print results, find the best right angle. It should have the perfect extrusion on the angle. Then modify the “Pressure Advance” with the value you just got.
Part 5, Retraction Test
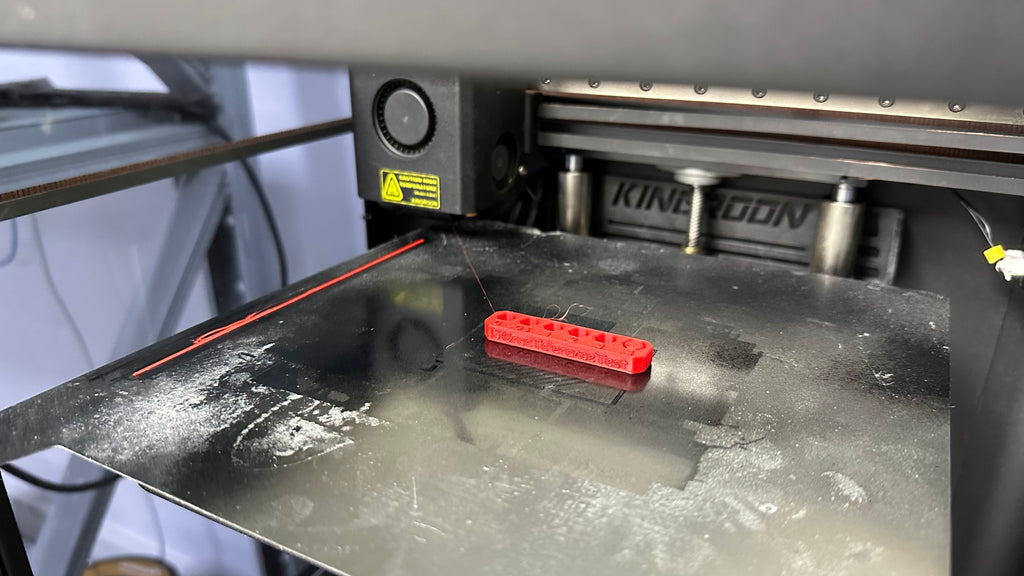
Choose “Retraction test”, keep the default settings if you use KP3S Pro V2, KLP1, any other KINGROON models or any printer with direct drive extruder. 2mm is already enough. Then Slice and print it.
It’s not only helps on reduce or avoid stringing, more importantly, avoid clogged nozzle issues, especially for all metal hotend.

So, you get a 21mm height retraction tower that shows clearly the stringing conditions. Observe the tower carefully, pick the best retraction settings. As we can see, the KLP1 gets no stringing at all until close to the top, so we choose a 0.3mm as the retraction distance.
Click to the edit button, the select the “Extruder” field and change the length as your new one.
Part 6, Orca Tolerance Test
Choose “Orca Tolerance Test”, then take a look at its X and Y distance, remember them down. It is 57.94mm on Y and 14.40mm on X. Slice and print the file.
Once the print is finished, use the Caliper to measure its width and length, then use them to calculate the shrinkages.
For example, we get 14.34mm on width and 57.67mm on length, then we take the average shrinkage 99% as the final result. Replace the default shrinkage with it and click save, you are all set.
We’ve been making tutorials and videos, for the KP3S Pro V2 and KLP1 since their launch, you can find them both on our YouTube channel and official website. The system images have also been supported with regular updates with Klipper updates, new features and bug fix.
As for Slicers, we also moved on form the default Cura Slicer profile, start to provide on PrusaSlicer profiles and OrcaSlicer profiles. Now, the OrcaSlicer Calibration test process is the final puzzle and improves the print quality one step further.
We will provide more presets and have more models supported soon.
Hi,
So sorry to read that you mention only “ gets regular update like an android phone” and not iPhone’s.
Security oblige me to work only with IOS/Apple.
Best
Do you have Orca profile for KP3S 3.0?