Kingroon KLP1 3D Printer Assembly Guide
Kingroon KLP1 3D Printer Assembly
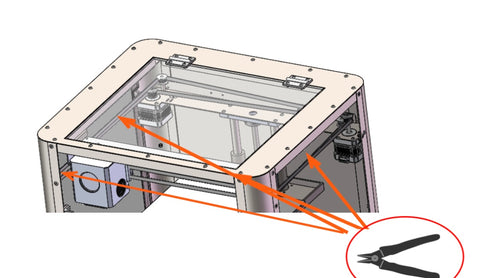
Step 1 Use scissors to remove the fixed straps from the belt.
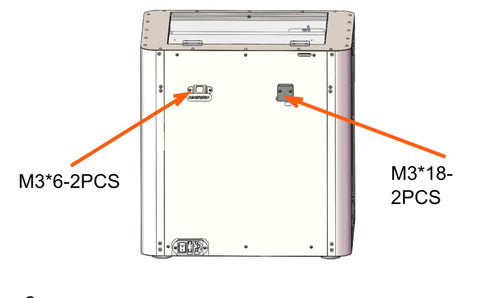
Step 2 Use M3 * 6 screws to fix the filament holder on the back of the machine, use M3 * 18 screws to fix the filament exhaust sensor on the back of the machine, and connect the wires.
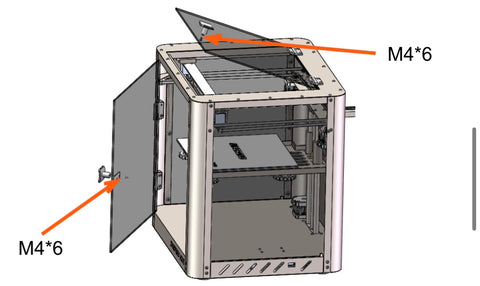
Step 3 Tear off the acrylic protective film and use M4 * 6 screws to secure the handle to the acrylic.
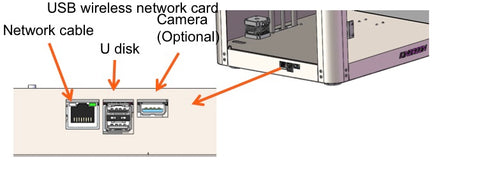
Step 4 Insert a network cable or wireless network card (note that the distance between the wireless network card and the router cannot exceed 5 meters)
Configure Network on Kingroon KLP1 3D Printer
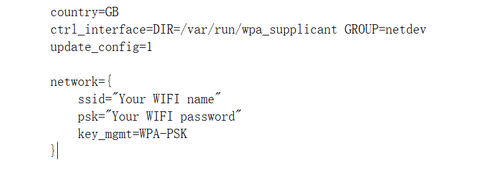
Step 1 Open the (wpa_supplicant wlan0. conf) file in the USB drive and modify your 2.4GZ WIFI account password, insert the USB drive into the machine and insert the wireless network card (pay attention to the wireless network card)The distance from the router should not exceed 5 meters, and then plug in the power cord to power on (insertPower on the power cord. Please note: Before starting the machine, please confirm the local voltage requirements,110V/220V switching) If using a network cable connection, there is no need for a configuration file. Simply plug in the USB drive and power it on,It is strongly recommended to use a network cable to connect your printer and router.
Step 2 Method 1: Wait for 5 minutes after turning on the computer. Once the network is successfully connected, the IP address will be saved to the root directory of the USB drive, with the file name ip.txt. The IP address is usually 192.168.X.X. If the USB flash drive does not show an IP address, please power off for 2 minutes and try powering on again.
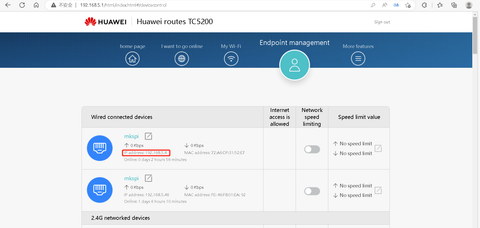
Method 2: Go to the management side of the router and check the IP address of the mkspi device. The access method of the management side of the router is usually written at the bottom of the router, and enter the IP address and password in the browser (the password of the management side of most routers is WIFI password or admin).
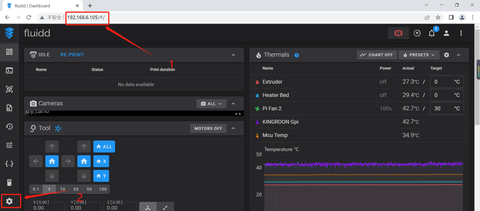
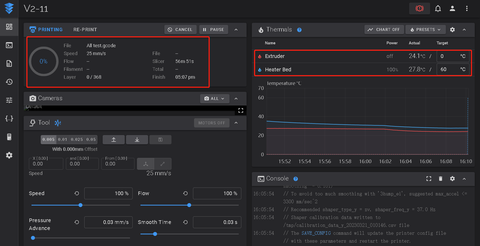
Step 3 Open the browser and input the queried IP to enter the Fluidd operation interface. The Fluidd operation interface can modify the language in the settings interface. Currently, it supports English/ Čeština /简体中文/繁體中文/Deutsch/ Español / Français /Italiano/ Magyar/Nederlands/Portugues/Русский язык/Українська Мова/한국어/ اللغة العربية /日本語
Kingroon KLP1 3D Printer Leveling
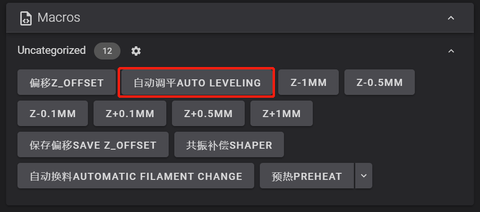
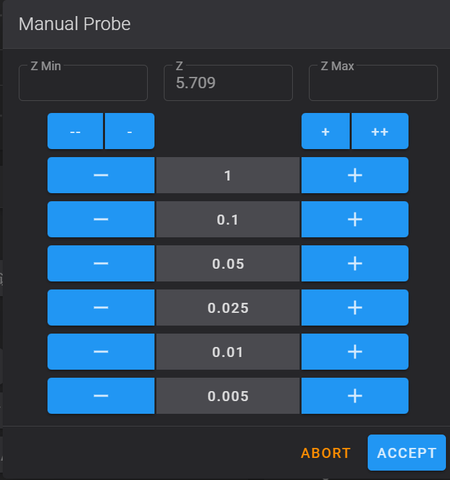
Step 4 Macros option, click on offset z_ The offset button will move the printer to the center position of the hot bed. Place a piece of A4 paper above the hot bed and adjust it up and down using the Manual Probe. Adjust the distance between the nozzle and to 0.1mm (there is some resistance when pulling the A4 paper). After the adjustment is completed, click ACCESS to save. Step 5 Click on automatic leveling for 36 point leveling.
Resonance Compensation
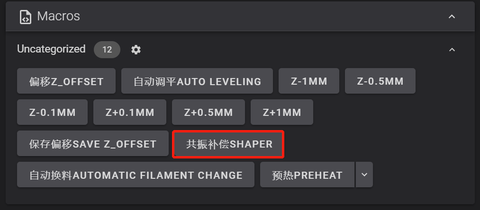
Step 6 Macros option, click on the Resonance Compensation shaper, and wait for vibration frequency data. Note: During the vibration compensation process, the printer will generate vibration noise in the vibration compensation shaper.
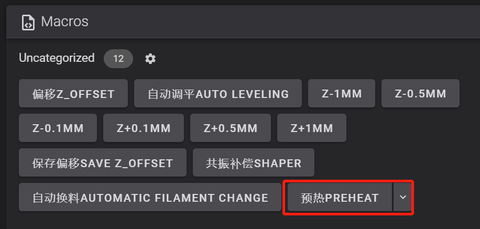
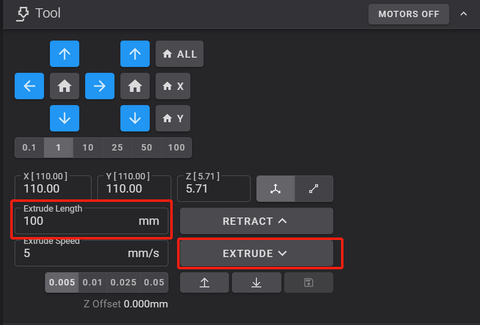
Step 7 Macros option, click on the preheating function, wait for the printer to automatically return to zero before loading the high-speed printing filament. Please pass the high-speed printing filament through the filament exhaust sensor and then feed it into the extruder.Tool option, change the Extrude Length to 100mm, then click EXTRUDE and wait for the nozzle to extrude the filament.
Pressure Advance Calibration
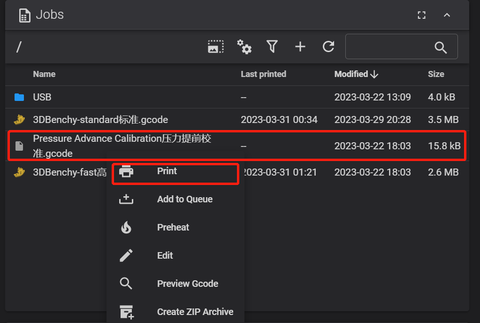
Step 8 Jobs option, print Pressure Advance Calibration.gcode file, observe the most complete line, and the value on the right is the Pressure advantage number.
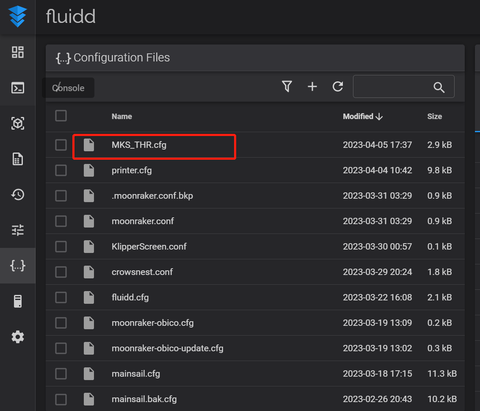
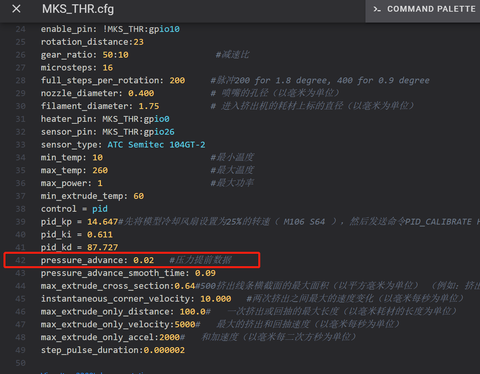
Step 9 Open MKS THR.cfg in the configuration file, modify the pressure advance Pressure advance data in 45 lines, save the data in the upper right corner, and restart the system. You are advised to calibrate Pressure advance every time you replace a consumable.
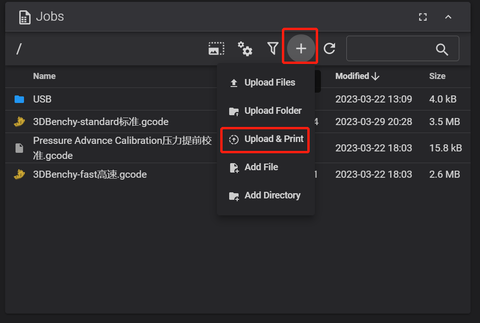
Step 10 Jobs option, click+to upload and print the file.
Step 11 Wait for the hot bed and nozzle to heat up to the specified temperature before printing begins.
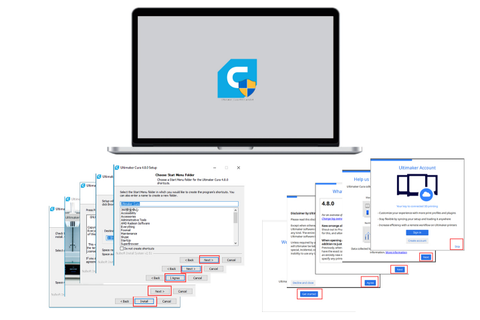
Step 1:Find the cura slicing software on the USB drive, and then install cura according to the instructions as follows
Step 2: Import the slicing configuration file from the USB drive into Cura 1.Place the "KIINGROON_KLP1" folder in the "share\cura\resources\quality" directory under the cura5.1 installation path.
2. Place the "KIINGROON_KLP1. def. json" file in the "share\cura\resources\definitions" directory in the installation path.
3. Place the "KIINGROON_KLP1_extruder_0. def. json" file in the "share\cura\resources\extruders" directory in the installation path.
4. Place the "KIINGROON_KLP1. stl" file in the "share\cura\resources\meshes" directory of the installation path. 5. Close all open CURA software and add KLP1 after reopening.
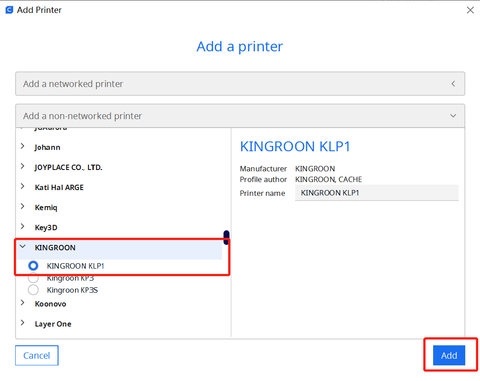
Step 4: Open cura, select a printer that is not connected to the network, and select KLP1 from KINGROON.If the model is not available, please check if the previous step is correct.

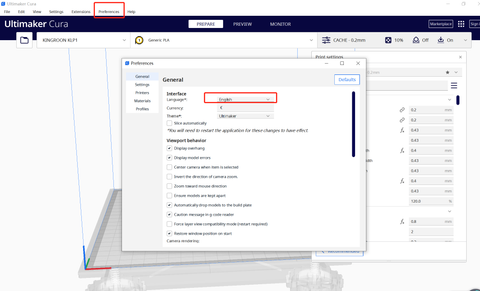
Step 5: Select the language you need and restart Cura
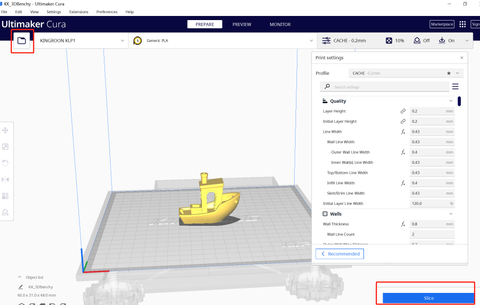
Step 6: Load the model and start slicing.
Kingroon has configured all parameters, You can directly save the Gcode to a USB drive for printing, Alternatively, you can directly upload Gcode for printing on the webpage.
Comments
Leave a comment