
Editing STL files is a fundamental skill for 3D printing enthusiasts and professionals. This guide will provide you with detailed steps and tips on how to use PrusaSlicer to modify your STL files effectively, using practical examples such as editing a basic 3D rabbit STL.
Introduction
Editing STL files allows you to customize, correct, and enhance your 3D models, ensuring the best possible print outcomes. PrusaSlicer is a user-friendly tool that simplifies the process of editing and preparing STL files for 3D printing.
Why Choose PrusaSlicer for Editing STL Files?
PrusaSlicer is a powerful and easy-to-use software tailored for 3D printing. Here’s why PrusaSlicer stands out:
● User-Friendly Interface: Intuitive and easy to navigate.
● Essential Editing Tools: Basic tools for modifying STL files.
● Integration with Prusa Printers: Optimized for Prusa 3D printers.
● Free and Open-Source: No cost with continuous updates and improvements.
Getting Started with PrusaSlicer
Before diving into editing, you need to set up PrusaSlicer and familiarize yourself with its interface.
Installation
● Download PrusaSlicer: Visit the Prusa3D website and download the latest version.
● Install PrusaSlicer: Follow the installation instructions for your operating system.
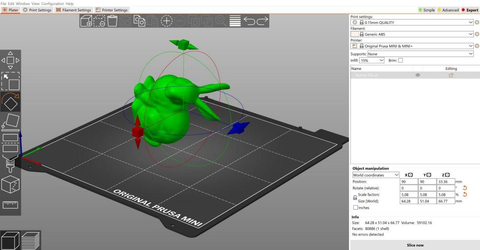
PrusaSlicer Interface Basics
● 3D View: The main area where you view and edit your models.
● Sidebar: Contains settings and tools for modifying the model.
- Top Menu: Access to file operations, printer settings, and more.
Step-by-Step Guide to Editing STL Files in PrusaSlicer
1. Importing the STL File
● Open PrusaSlicer: Launch the application.
● Import STL: Click “Add”in the top menu and select your STL file (e.g., a basic 3D rabbit STL).
2. Navigating the Model
● Orbit View: Right-click and drag to orbit around the model.
● Pan View: Press Shift + right-clickand drag to pan.
● Zoom In/Out: Scroll wheel to zoom.
3. Basic Editing Tools
● Move: Select the model, then use the “Move”tool from the sidebar. Drag arrows to reposition.
● Example: Move the 3D rabbit to the center of the build plate.
● Scale: Select the model, then use the “Scale”tool from the sidebar. Adjust the size by dragging the scale handles.
● Example: Scale the 3D rabbit to 150% of its original size.

● Rotate: Select the model, then use the “Rotate”tool from the sidebar. Rotate the model by dragging the rotation handles.
● Example: Rotate the 3D rabbit by 90 degrees on the X-axis.
4. Advanced Editing Techniques

● Cut Tool: Use the “Cut”tool from the sidebar to slice the model into parts.
Example: Cut the 3D rabbit in half to print in two parts. In this mode it is also possible to create dovetails to make parts friction fit together after 3D printing.

● Supports: Add or remove supports manually using the “Paint on Supports”
Example: Adding custom supports to the rabbit's ears. Doing this helps to avoid printing failures using support material.

● Modifier Meshes: Apply modifier meshes to specific areas for detailed modifications.
Example: In this example, I added a sphere to make the rabbit's tail more round, then exported it as an STL file. The exported file can be sliced in PrusaSlicer or imported into CURA.

Right-click on the object and right-click on the model name. Select “Add part” and then either select an “object” or “load” your own model to add an additional model to the selected model.
● Adding Text or Logos: Use the “Add Part”feature to incorporate text or logos into your
Example: in this example we are adding text to a STL file useful for adding in inbuilt labels on 3D prints.

Right click on the model name, right click “add text” or SVG and input your text. Select option “Use Surface” drag text to location
● Merging Models: Import multiple STL files and merge them into a single model.
Example: in this example we are combining two 3D models as one.
Right click on the model name from the file name on the right and add a platform resize and reposition if needed. You can load a different separate model as well. Reposition the base underneath the rabbit. If you want to change the parameters of the object additional options are located in the gear icon if you right click on it.

● Boolean Operations: Perform basic boolean operations (e.g., union, subtraction) to modify complex shapes.
Example: Subtract a cylinder from the rabbit to create a hole.
Select the model. If it has a complex mesh, go to the gear on the left, right-click, and select “Simplify.” If this isn't done, Boolean operations will not occur correctly and an error message will appear.
Then, right-click and add a “Negative Volume.” In this case, we are adding a cylinder and positioning and resizing it where needed.
Once the desired look is achieved, export your model. Export or slice and export as G-code to print.
The changes will appear after export.

5. Preparing the Model for Printing
● Check for Errors: Use the “Fix by Windows repair algorithm” by selecting the gear on the right of the model in the selection pain.
● Add Supports: Automatically generate supports if needed.
● Slice the Model: Click “Slice Now”to prepare the model for printing.
6. Exporting the Edited STL File
● Export G-Code: Once the model is sliced, click “Export G-Code”to save the file for printing.
● Export STL: If you need to save the edited STL file, click File > Export > Export as STL.
Common Issues and Solutions
How to Fix Non-Manifold Edges?
Non-manifold edges can cause print issues. Right click on the model and use “Fix by Windows repair algorithm” l to identify and fix these problems automatically.
How to Reduce Polygon Count?
To reduce the polygon count in the model, right-click on the gear and select “Simplify Model.” You can also click on the model in the main window, right-click on the model, and the option will appear there as well.

How to Merge Multiple STL Files?
● Import Additional Files: Click Addto import multiple STL files.
● Combine Models: Position the models as needed, then export them as a single STL file.
FAQs
What is the Easiest Way to Edit STL Files in PrusaSlicer?
Using the basic tools like move, scale, and rotate in PrusaSlicer’s intuitive interface makes it accessible for beginners.
Can PrusaSlicer Handle Complex STL Files?
While PrusaSlicer is best suited for basic edits and print preparation, it can handle moderately complex models effectively.
How Do I Repair a Corrupted STL File in PrusaSlicer?
Use the “Fix by Windows repair algorithm” tool to automatically identify and repair corruptions in STL files.
Conclusion
Editing STL files in PrusaSlicer provides a simple and effective approach to customizing 3D models. By following this comprehensive guide and practicing with examples like the 3D rabbit, you can make precise modifications and ensure high-quality prints. PrusaSlicer’s user-friendly interface and essential editing tools make it an ideal choice for both beginners and experienced users.