Collapsing Swords are something we makers really want to print with, it is so cool to have it extended with that unique and identical sound. But it is hard to successes even in the slow mode, let alone printing them with Klipper models like KP3S Pro V2 and KLP1.
This tutorial will show you how to optimize your slicer settings on Ultimaker Cura, PrusaSlicer and OrcaSlicer to print collapsing swords easily.
Before start, please tune your KP3S Pro V2 and KLP1 as the below tutorial shows.
Collapsing Swords, a small challenge to your KP3S Pro v2 and KLP1
Part 1 Choosing Slicer
OrcaSlicer> PrusaSlicer> Ultimaker Cura
Back to the slicers, Ultimaker Cura, PrusaSlicer and OrcaSlicer are the top 3 slicers that are highly recommended for we makers, especially you are using the Klipper models. For beginners or who is looking for a change, OrcaSlicer is the best option. Clearly, the Ultimaker Cura is the most common slicer and it is powerful for slicing and processing models, but it has some issues after its 5.0 versions.
KP3S Pro V2 and KLP1 users, you can get the Slicer settings from the below links:
Ultimaker Cura:
KINGROON KP3S Pro V2 and KLP1 3D Printer Cura Profile Setting
OrcaSlicer:
OrcaSlicer Using on Your KINGROON KP3S Pro V2 and KLP1/OrcaSlicer
We will upload the related slicing profiles soon, so you guys can use them directly.
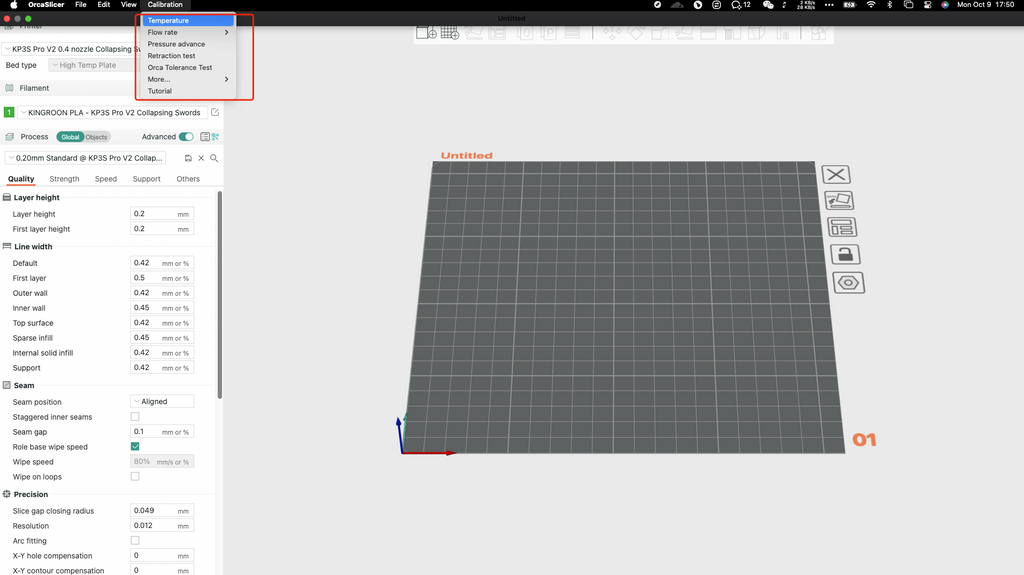
Back to OrcaSlicer, build-in calibration test is another pro that we decide to recommend it. By using it and tune the settings one by one, your printer can work better than ever.
Part 2 Adjustments for each Slicer
So, you have finished setup and tuning to your KINGROON KP3S Pro V2 or KLP1 by following the user manual or the below tutorial, and have our slicing settings imported, you are ready for the next step.
Collapsing Swords, a small challenge to your KP3S Pro v2 and KLP1
2.1 Ultimaker Cura
In Ultimaker Cura, there are a few settings to adjust.
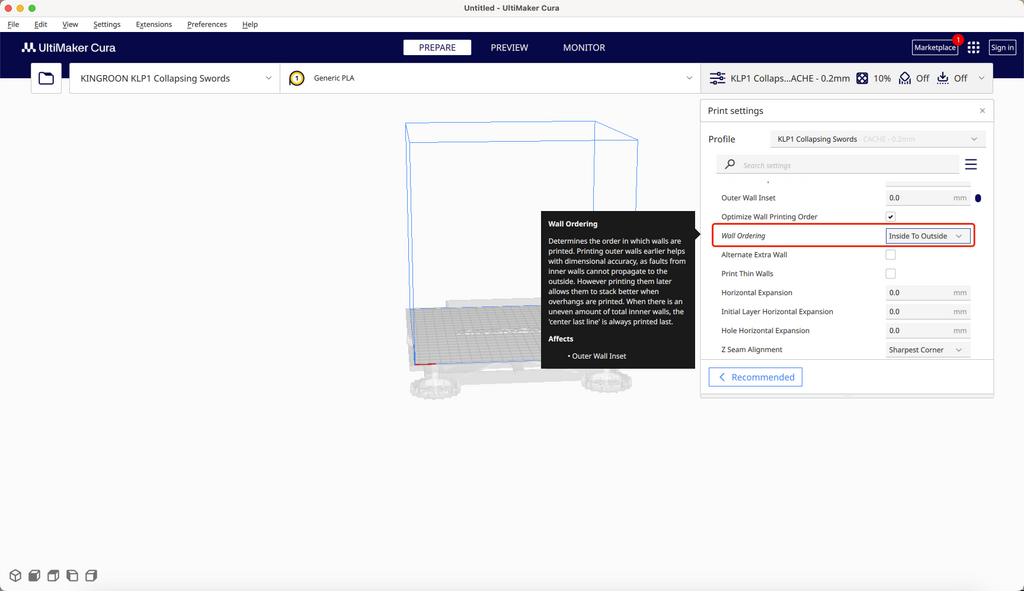
Step1 Change the “Wall Ordering” to “Inside To Outside”
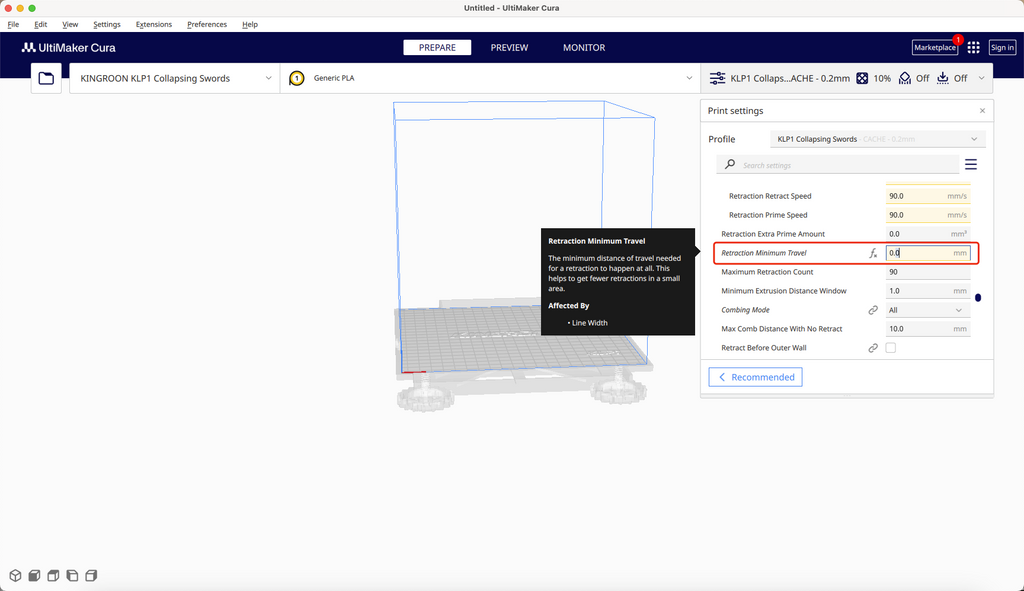
Step 2 Set the “Retraction Minimum Travel” to “0.0 mm”
After that, adjust the printing temperature to 205/40 to make sure the extrusion is accurate.
2.2 PrusaSlicer
After importing the profile, do the following adjustments in the Slicer
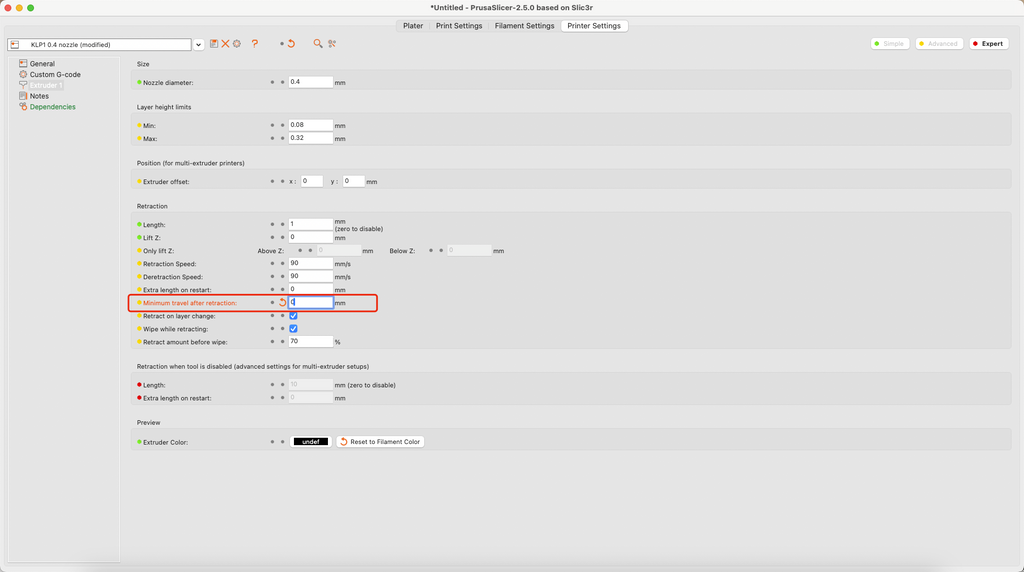
Step1 Go to “Printer Settings”, change the “Minimum travel after retraction” to 0.0 mm
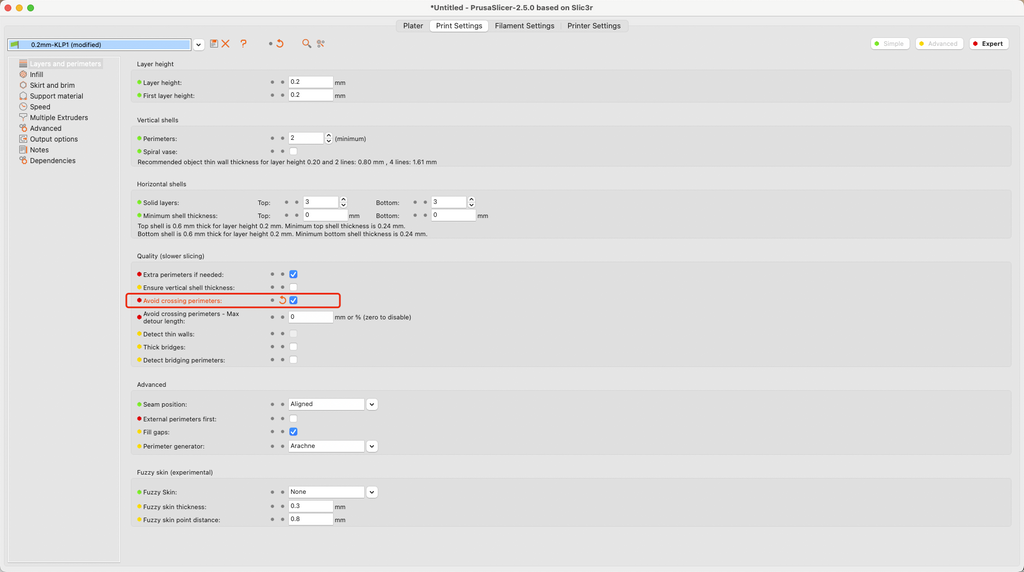
Step 2 Enable “Avoid crossing perimeters”
Step 3 Change “Perimeter generator” to “Classic”
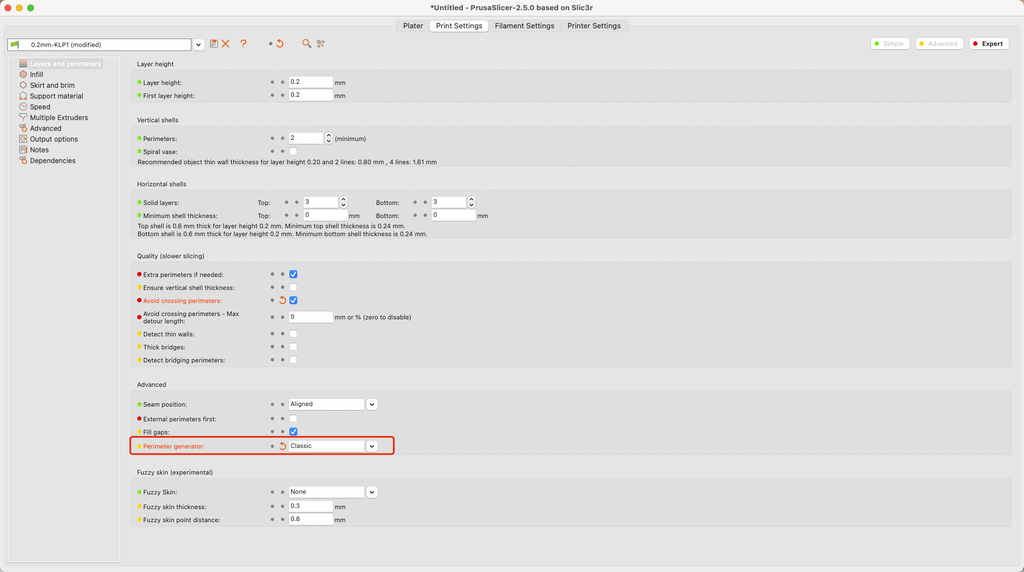
It is one of the key features for printing Collapsing Swords, but you cannot change it in the Ultimaker Cura.
2.3 OrcaSlicer
Thanks to the powerful features, OrcaSlicer will be the guarantee for a successful printing. It provides the best printing quality on your KINGROON KP3S Pro V2 and KLP1.
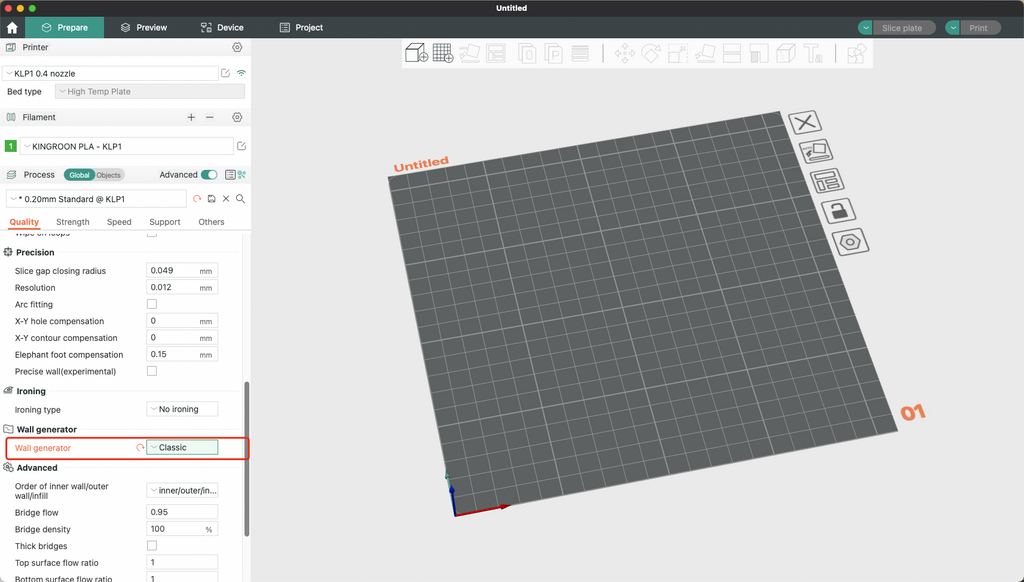
Step1 Go to the “Quality” field, change the “Wall generator” to “Classic”, it equals “Perimeter generator” in PrusaSlicer, but is “Arachne” and unchangeable in Cura. But it’s a key fracture to print Collapsing Swords.
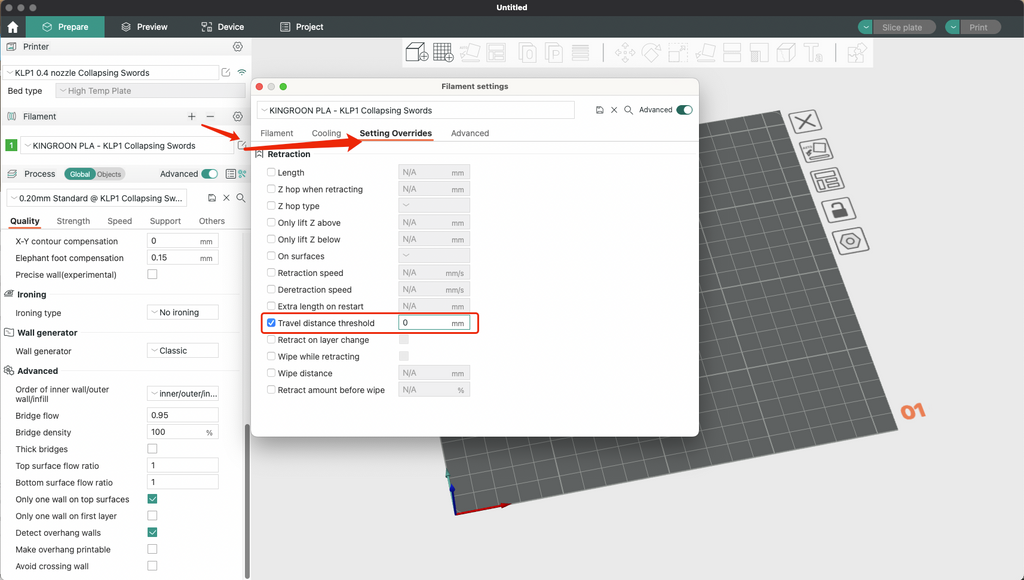
Step 2 Click “Filament”, Select “Settings Overrides”, then set “Travel distance threshold” to 0 mm.
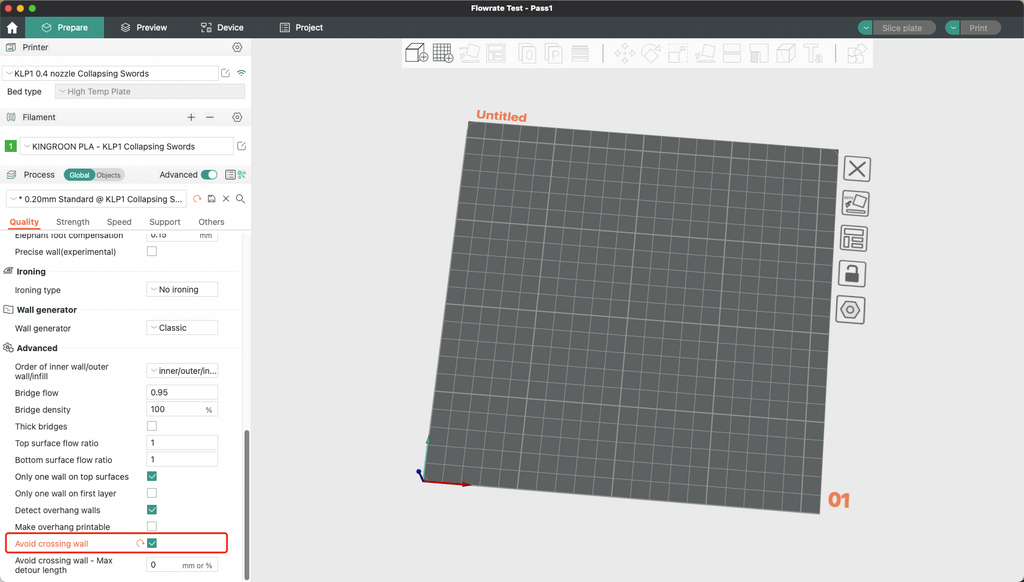
Step 3 Go to “Quality” field, enable “Avoid crossing wall”
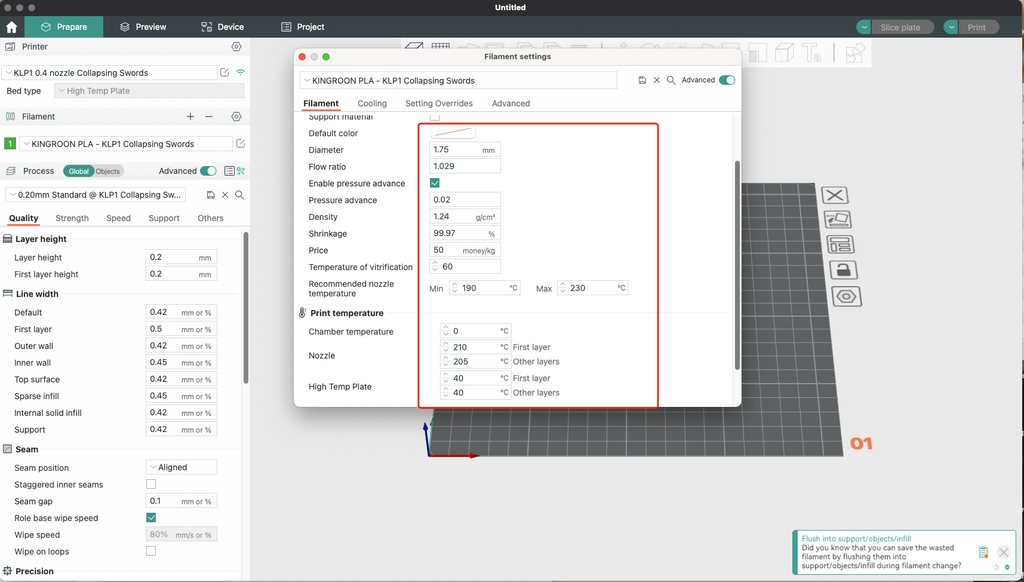
Step 4 Go to “Filament” field to add some customized settings. Use your own settings, if you already got your own test. Remember to keep the bed temperature accurate and use glue stick. Overheating will cause elephant foot on the initial layers, and lacking of stick make cause your prints fall from the build plate.
Part 3 Collapsing Swords
Now you are ready for printing and the KP3S Pro V2 and KLP1 helps you get those cool swords way much faster, it’s time for prints.
Designer “3DPrintingWorld” is one of the masters who designs a lot of Collapsing Swords. Most of his designs are free, and you can find many classical swords such as lightsaber. https://www.printables.com/@3DPrintingWorld
After that, “PLAYART3D”, designs a lot of cool “Katanas” in his Cults3d page. They are paid models but really is amazing. https://cults3d.com/en/users/PlayArt3D/3d-models
Next time we are going to recommend some Collapsing Swords.

