3D Print timelapse videos add an exciting dimension to 3D printing. They allow you to capture the entire printing process and share it with others. Whether you want to showcase your creations, analyze print failures, or simply enjoy the mesmerizing dance of the printer, timelapses are a valuable tool.
In this guide, we’ll demystify the process of setting up timelapse videos using Klipper firmware. Specifically, we’ll focus on integrating timelapse functionality with Fluidd or Mainsail, making it accessible even for beginners. By the end of this article, you’ll be ready to create captivating timelapse videos of your 3D prints and share them with your community.
Benefits of Timelapse Videos
Before we delve into the technical details, let’s discuss why timelapse videos are worth exploring:
1. Showcase Your Creations: Timelapses allow you to present your 3D prints in an engaging and dynamic format. Whether it’s a functional part, a decorative sculpture, or a complex mechanical assembly, timelapses make your designs come alive.
2. Analyze Print Failures: When a print fails, it can be frustrating. Timelapses provide valuable insights by capturing the entire process. Analyzing where things went wrong becomes easier when you can review the entire print in a condensed format.
3. Share Progress and Techniques: Timelapses are a fantastic way to share your progress on social media platforms, forums, or YouTube. They also allow you to demonstrate specific printing techniques, such as bridging, overhangs, or infill patterns.
4. Document Your Journey: As you gain experience and improve your skills, timelapses become a visual diary of your 3D printing journey. Looking back at your early prints and comparing them to your current work can be incredibly rewarding.
Requirements for Creating Timelapse Videos
To embark on your timelapse adventure, gather the following essentials:
1. 3D Printer with Klipper Firmware:
Ensure your 3D printer is running Klipper firmware. If you haven’t installed Klipper yet, you can follow this guide on Klipper installation using Fluidd or explore other installation methods like installing Klipper using Mainsail OS or KIAUH method.
2. Camera:
Choose a camera to capture the timelapse videos. You have a couple of options:
USB Webcam: A USB webcam (720p resolution or higher) like the Logitech C720 works well. It strikes a balance between affordability and quality.
Raspberry Pi Camera: For a quick and straightforward solution, consider using a Raspberry Pi camera. These cameras are easy to configure and can shoot 1080p timelapse videos.
3. Good Lighting and Stable Camera Mount:
● Position your camera to capture the entire print bed and the movement of the nozzle.
● Stable mounting ensures that your footage remains steady throughout the prints.
How to Set Up Timelapse on Klipper
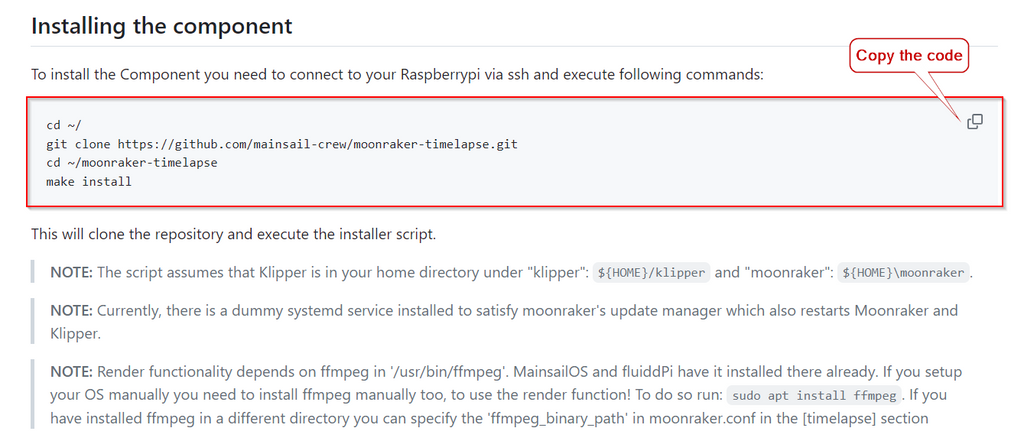
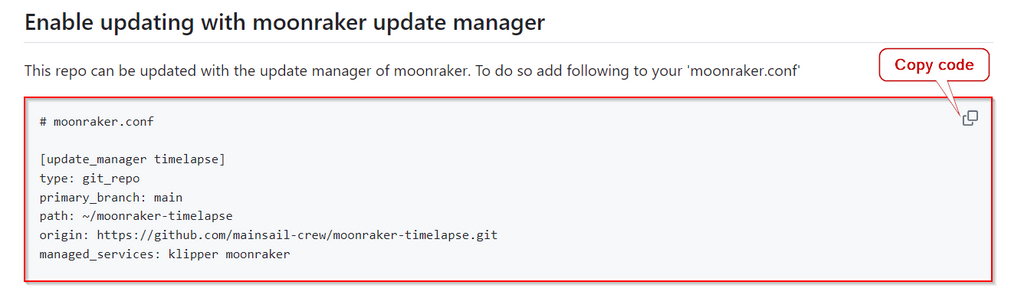
1. Install Moonraker Timelapse Component
2. Visit the Moonraker timelapse website.
3. Copy the code provided under the “Installing the component”
How to Configure Moonraker with PuTTY
1. Open PuTTY on Your Computer:
● PuTTY is a terminal emulator that allows you to connect to your Raspberry Pi remotely. You can download PuTTY from its official website here.
● Once installed, open PuTTY.
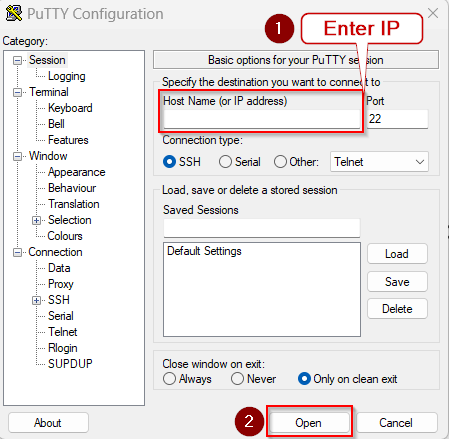
2. Input the IP Address of Your Raspberry Pi:
● Your Raspberry Pi has an IP address (similar to a phone number) that allows you to communicate with it over the network.
● If you own a 3D printer with pre-installed Klipper firmware and a Makerbase board like Kingroon KLP1 CoreXY Printer, you can easily find the printer’s IP address directly from the printer’s screen interface.
● When you open PuTTY, you’ll see a field labeled “Host Name (or IP address).” Enter the IP address of your Raspberry Pi or 3D printer here.
3. Log In Using Your Credentials:
● After entering the IP address, click “Open.”.
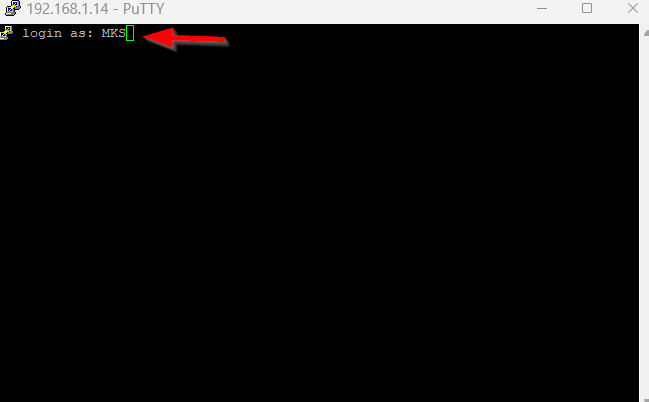
● PuTTY will prompt you to log in. Use the credentials (username and password) you set up for your Raspberry Pi.
● Note: The default username is usually “pi,” and the default password is “raspberry” (unless you’ve changed them). And in case of using a Makerbase 3D printer the default username and password will be MKS and makerbase respectively.
4. Paste the Timelapse Code:
● Once you’re logged in, you’ll see a terminal window.
● Go back to the Moonraker timelapse website where you copied the installation code.
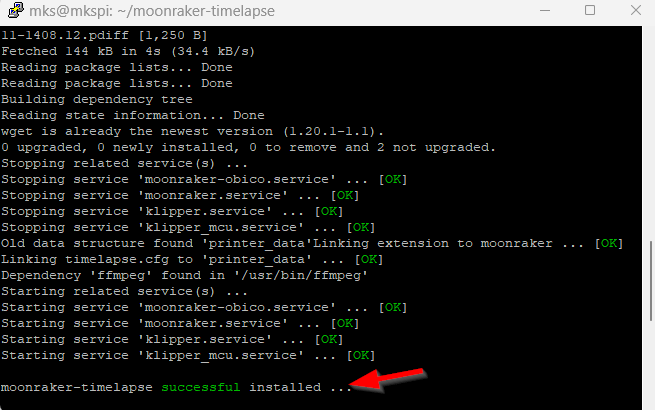
● Right-click inside the PuTTY window to paste the code.
● Press “Enter.”
● The timelapse plugin will now be installed on your Klipper instance, and you’ll receive a success message.
Note: During the installing process you may be asked again to enter the password for your Raspberry Pi or Makerbase 3D printer.
5. Enable Timelapse Component Update
1. Copy the code from the bottom of the same Moonraker timelapse website.
2. Input the IP address of your Raspberry Pi or Makerbase 3D printer and open the Fluidd web interface in your browser.
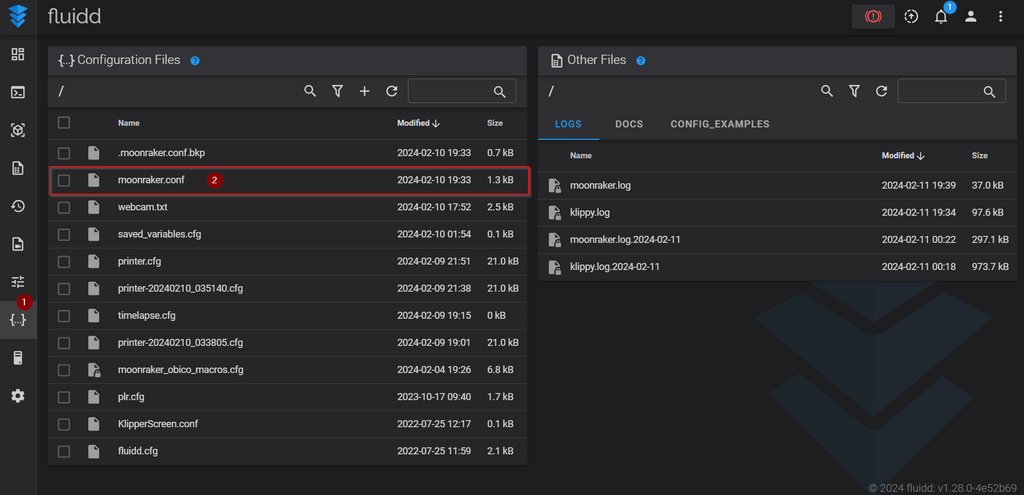
3. Navigate to the configurations section and open the moonraker.conf
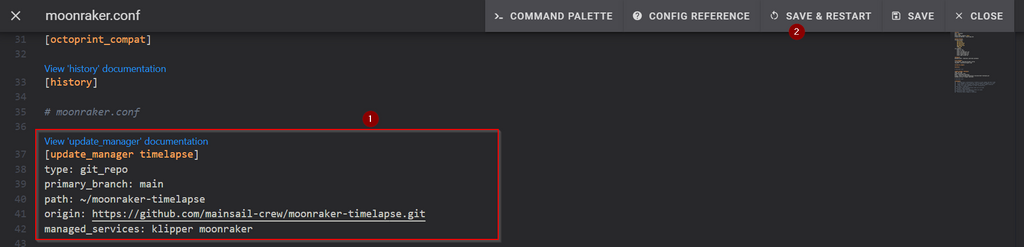
4. Paste the copied code at the bottom of the file and click on “Save and Restart.”
6. Check for Timelapse Updates
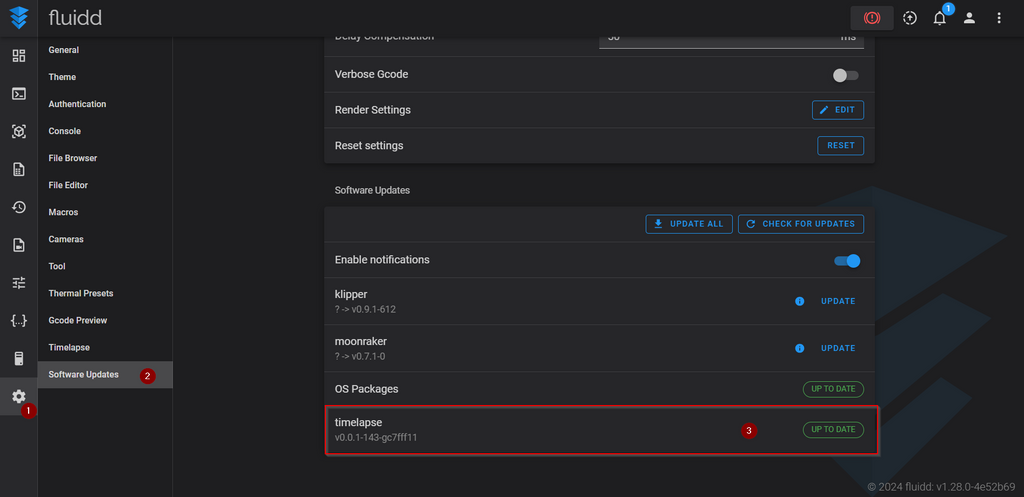
1.In Fluidd, go to “Settings” and select “Software Updates.”
2.Look for the timelapse update section. You should see an option related to timelapse.
7. Update Timelapse Directly Through Fluidd
You can now update the timelapse functionality directly through Fluidd whenever needed.
Configuring Timelapse Macro in Ultimaker Cura
1. Visit the Moonraker Timelapse Configuration Website:
Go to the Moonraker timelapse configuration website.
Copy the code provided under the “Define the Gcode Macro” section.

2. Edit Your Printer Configuration File (printer.cfg):
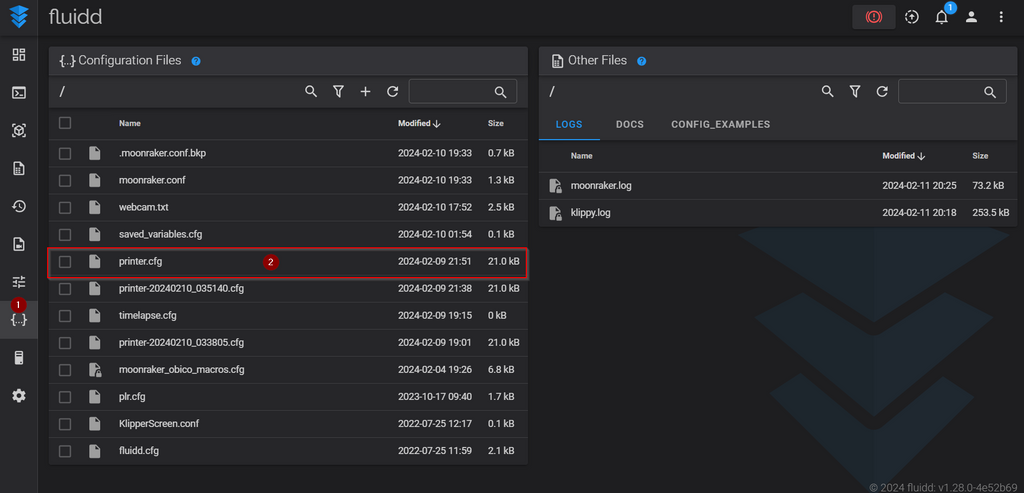
Open your Fluidd interface.
Navigate to the configuration section and open the printer.cfg file.
Paste the copied code into the printer.cfg file. 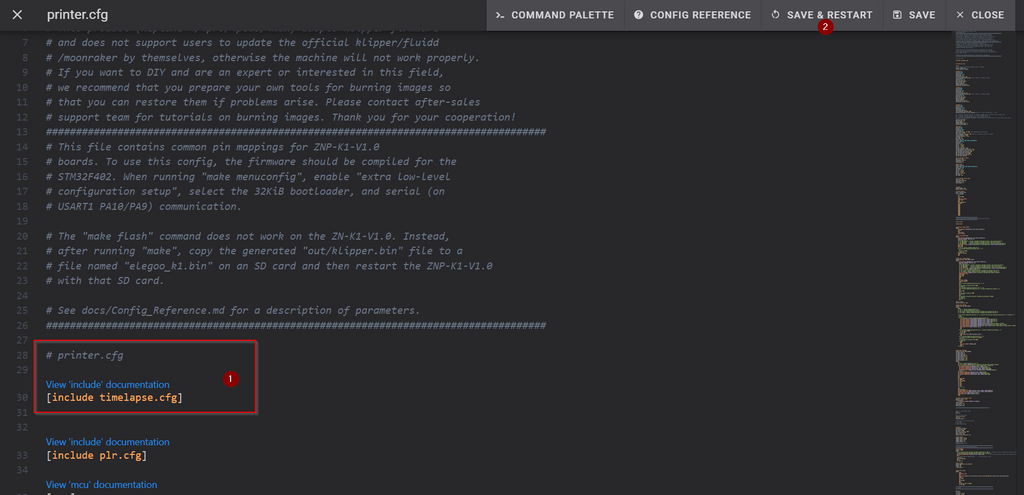
Save the changes and restart your printer.
3. Open Ultimaker Cura on Your Desktop:
If you’re using a different slicer, refer to the Moonraker configuration website for the appropriate steps.
In Ultimaker Cura, click on Extensions -> Post Processing -> Modify G-Code. 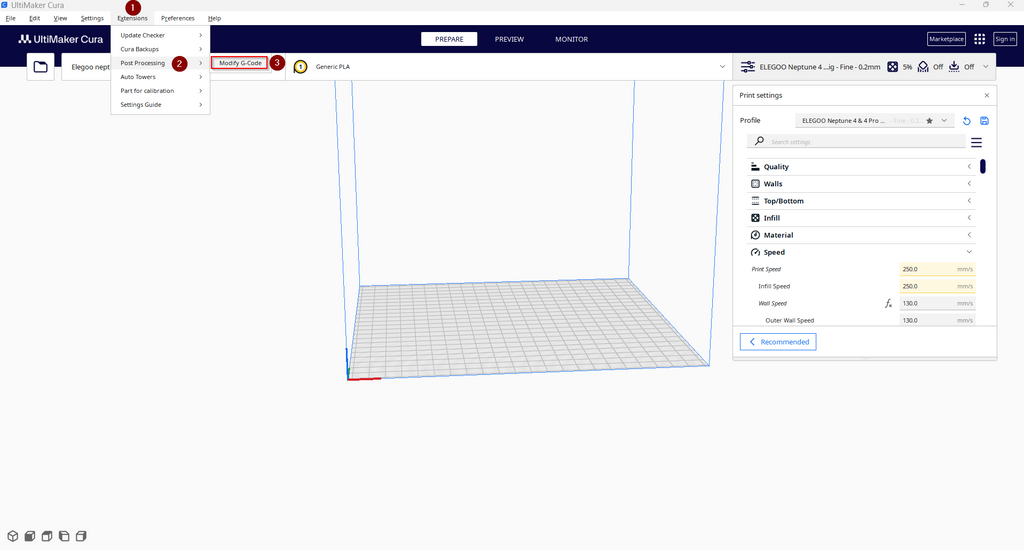
4. Add the Timelapse Command:
Navigate to Add a script -> Insert at layer change.
In the field labeled “G-code to insert,” enter: TIMELAPSE_TAKE_FRAME.
Cura will now insert this command after every layer change, indicating to the Klipper firmware to take a snapshot. 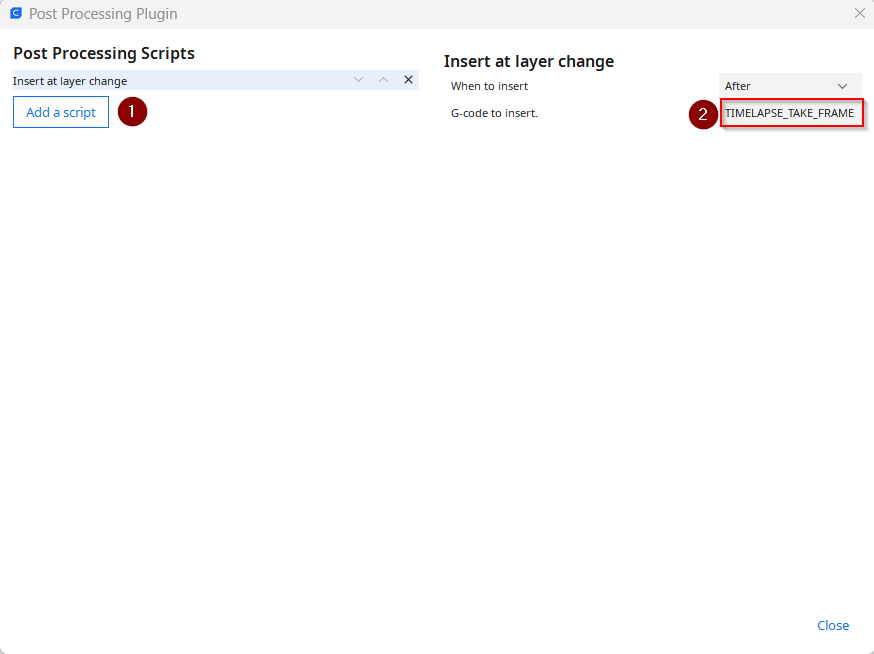
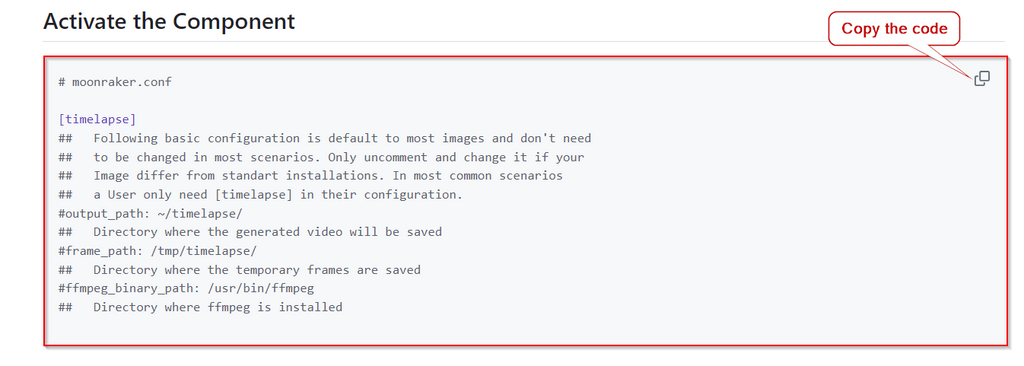
Activating the Timelapse Component
1. Copy the Code:
Visit the Moonraker timelapse configuration website.
Copy the code provided under the “Activate the Component” section.
2. Edit the moonraker.conf File:
Go to the configuration section in your Fluidd interface.
Open the moonraker.conf file.
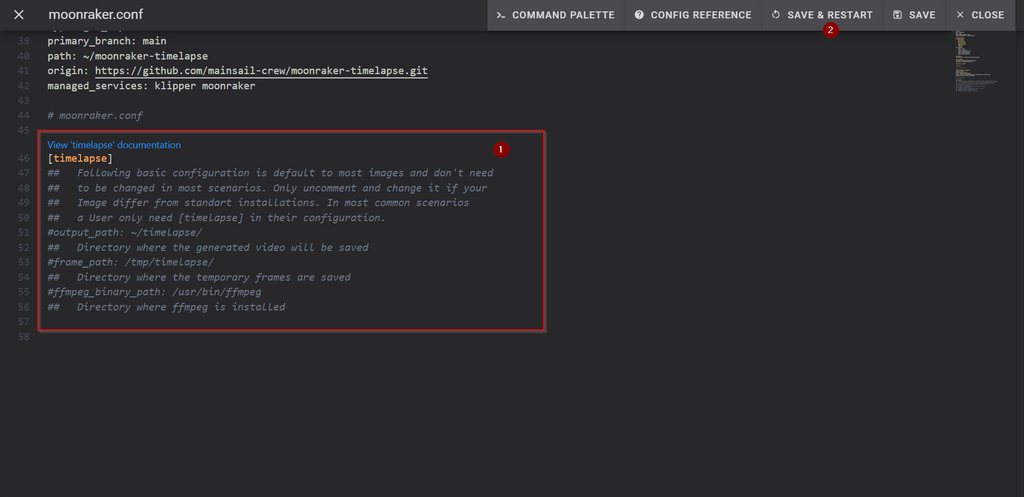
Paste the copied code into the file.
Save the changes and restart your printer.
3. Check the Fluidd Interface:
You’ll now notice a separate timelapse section in the menu bar of your Fluidd interface.
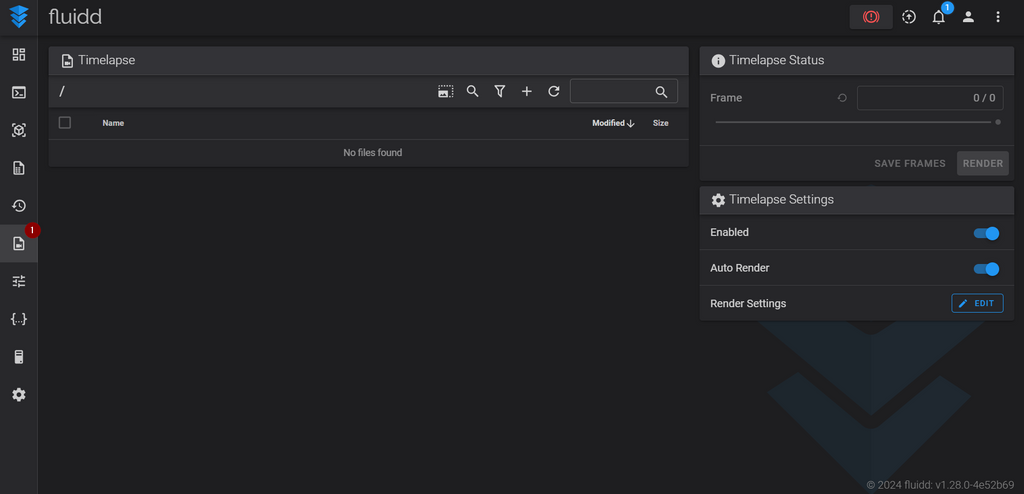
Great job! 🎉 You’ve successfully set up the timelapse feature on your Klipper 3D printer. Now, you can record captivating videos of your prints. To access your timelapse videos, head over to the dedicated section in your Fluidd interface.
Features in Klipper Timelapse
1. Render Settings
Render settings allow you to control the final output of your Klipper timelapse video.
Frame Rate: The frame rate indicates the number of shots per minute that will be included in the final video. Higher frame rates result in smoother videos, as they combine multiple snapshots within a single minute. For introductory purposes, a 30 fps (frames per second) rate is adequate for good results.
Saving Frames/Shots: You can choose to save the individual frames or shots captured during the timelapse. This function allows you to edit these snapshots in your preferred editing software and create a customized timelapse video.
Thumbnail Generation: The timelapse plugin can auto-generate a thumbnail for your video and embed it in the file. Thumbnails help quickly recognize your 3D prints.
2. Camera Selection and Mode
Multi-Camera Setup: If you have multiple cameras, you can select a particular camera to shoot your timelapse videos. This feature allows you to choose a primary camera for streaming your video and a high-resolution one specifically for recording timelapses.
Camera Mode:
Gcode Macro Command: This mode uses the macro command we configured earlier (TIMELAPSE_TAKE_FRAME) to capture a snapshot after every layer change during printing.
Hyperlapse Setting: If your slicer lacks support for inserting custom Gcode scripts, the Hyperlapse mode comes in handy. You can set the time duration for snapshots (e.g., every 20 seconds), and the timelapse plugin will automatically record shots at the specified intervals and combine them into the final video.
Remember to experiment with these settings to achieve the best results for your timelapse videos.
Tips and Tricks for Getting Good Timelapse Videos
Creating captivating timelapse videos requires attention to detail and some creative choices. Here are some tips and tricks to enhance your Klipper timelapse videos:
1. Camera Placement and Stability:
● Position your camera to capture the entire print bed and nozzle movement.
● Ensure stable mounting to avoid shaky footage.
2. Lighting:
● Good lighting is crucial. Avoid harsh shadows or uneven illumination.
● Natural light or diffused artificial light works well.
3. Frame Rate:
● Choose an appropriate frame rate (fps) for your timelapse. A higher frame rate (e.g., 30 fps) results in smoother videos.
● Experiment to find the right balance between smoothness and file size.
4. Editing Software:
● Use video editing software to compile your captured frames into a time-lapse video.
● Trim unnecessary parts, adjust exposure, and add transitions if desired.
5. Composition:
● Consider the composition of your shots. Frame your print nicely within the video.
● Include interesting elements like moving parts, intricate details, or changing colors.
6. Hyperlapse Mode:
● If your slicer doesn’t support custom Gcode scripts, use the Hyperlapse mode in Klipper.
● Set a time interval (e.g., 20 seconds) for automatic snapshots during printing.
7. Thumbnail Generation:
Enable thumbnail generation. Thumbnails help quickly identify your prints.
8. Experiment and Learn:
● Try different camera angles, zoom levels, and settings.
● Learn from each timelapse and improve with each print.
Conclusion
In summary, timelapse videos are a powerful tool for 3D printing enthusiasts. By combining Klipper firmware with the right camera setup, you can capture the entire printing process in a condensed format. Timelapses serve multiple purposes: showcasing your creations, analyzing print failures, and sharing progress with the community. Remember to experiment with angles, lighting, and video editing to create captivating videos. Whether you’re documenting your journey or simply enjoying the mesmerizing dance of your printer, timelapses add an extra layer of magic to the world of 3D printing. Happy printing, and may your timelapse videos inspire fellow makers!
In this article, we covered how to setup and configure the Klipper Moonraker timelapse component. Now, you are ready to start capturing timelapse videos. Next, you can learn about all of the various timelapse settings available in our article on Timelapse Settings in Mainsail or Timelapse Settings in Fluidd.
Salve,ho eseguito tutta la guida per installare time lapse sulla mia Kp3s pro v2 ma alla fine tutti i componenti installati mi danno errore su fluidd e quindi non posso usarlo,la guida non funziona con questo klipper installato sulla Kp3s pro v2,se qualcuno ci è riuscito e vorrebbe condividere la guida sarei grato.