Kingroon KP6 Print Platform Leveling
First of all, check and ensure the LCD screen and print platform of your Kingroon KP6 LCD resin 3D printer are clean and free of dust.
Loose screws on the print platform, as following.

Install the print platform on the bracket, and tighten with the big knob on the top.

Put a a piece of A4 paper on the LCD screen.

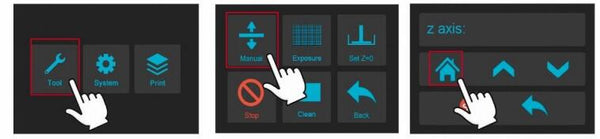

Finally, click the screen, move the Z axis upwards. Click again zero / home Z axis until you feel the resistance when pulling the paper back and forth.
It is necessary to fine tune the leveling again. Because tightening the platform screw might change the Z height. Click on the touch screen and let the Z axis drop (or rise) with 0.1mm interval per click, until feel resistance between the LCD screen and platform when dragging the 4A paper.
Finally, set the current Z height as the Zero position where the first layer will be started: Click “Tools” “Z=0” on the touch screen, and then click “OK” on the pop-up windows. Till now, the leveling part is completed.
UV-LCD Function Test
Gradually rise the platform about 120mm , then click “Tools” “Exposure” “Next” on the screen as following pictures shown. If the screen can display a complete grid, it means the LCD screen works normal.

Install Resin Vat
Make sure the resin vat is nice and clean, then install it till aligning with the two limit screws on the panel. Finally, tighten the vat screws on both sides to fix the vat.
I still can’t get prints without lines.
From simple objects to small parts, they all come with printing lines.
I have already made all the changes mentioned, exposure time, speed, changed the axis, and I am not getting satisfactory results.
My printer clearly came with a problem from the factory. Is it not possible to exchange it for a new one? It’s extremely frustrating to buy something and never be able to use it.
Replaced the 4k lcd screen as the original was cracked. The replacement does not appear as bright and no grid is displayed on the surface of the LCD. Defective LCD or error in reassembly?
cant set Z-0 ""Z-zero is decided by trigger position" error, i did not find firmware update for it
boa tarde
eu comprei uma impressora kingroon kp8 dentro da pen driver não vinha software
eu não consigo por maquina trabalhar pode me dizer onde posso ir buscar e fazer
Download —-Firmware: por favor
aguardo sua resposta obrigado