
When it comes to 3d printing accuracy and quality, there are so many variables to consider. and honestly approaching a 3d printer for the first time and trying to improve on how it prints can be really really daunting, but there is approaches you can take to try to remove some of those variables and focus on key areas step by step to gradually improve the quality and accuracy of your 3d prints. This tutorial is from Maker's Muse YouTube.
Bed Leveling Nozzle Height
First of all, we need to make sure the first layer is going down correctly. The nozzle is not too close or not too far. Because if it's too close, the first layers will squish together. And when printing parts with multiple moving parts will end up welding everything together.

Using a 0.2mm thickness clearance gauge / feeler gauge to help you to get a good first layer. Preheat your printer to the operating temperature and home the print bed and then move the z-axis up 0.2mm, then i'll use that feeler gauge to make sure the nozzle just clears it at all points on a manually leveled bed.
Then you could check it with a large print to see how that first layer is laying down.
When your layers come out looking a little bit stringy, not joined together nicely and sometimes even like wiggly that's when the nozzle is too far away from the heatbed.

If it's too close, you might dig into the print surface and damage your nozzle or the print surface. Your nozzle may squish material out of the way because it doesn't have enough room to extrude correctly.
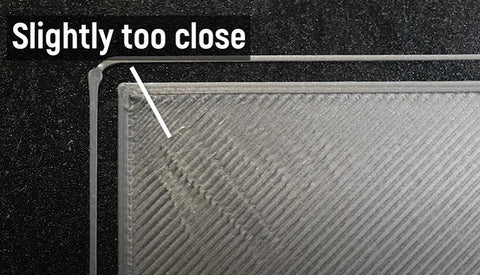
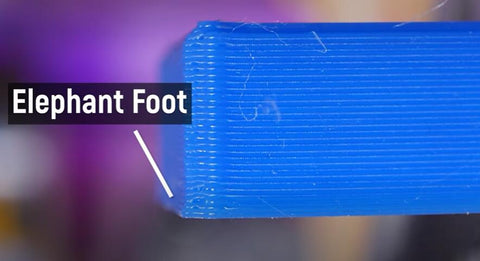
If you keep printing with the first lay like this, you would most probably get elephant's foot where it extrudes too much and bulges out and then comes back in.
3D Printer eStep Calibration
Once you're confident that you've got a great first layer then you need to start worrying about your printer's actual accuracy. 3D printers work with gcode sent to them. G-code is essentially commands to move in certain coordinates and then the machine will tell the motors to spin a certain amount and then hopefully that certain amount translates into an accurate movement in the dimensions that you want.
The motors are called stepper motors for a reason they move in steps. What you need to calibrate is your steps per millimeter, that is how many steps are involved per millimeter of movement. You would hope the printer comes fully calibrated from the factory. But sometimes they don't.
3D Printer 20mm Test Cube
We often start a test print with a calibration cube. The test cube meant to be 20mm on every dimension. Grab a pair of calipers after your print and measure the different dimensions.

It's very unlikely you'll be dead on 20mm. Because these machines extruding plastic out of a 0.4mm nozzle generally and they're not going to be perfect. If they are very much wrong for example your cube is 22mm or 19mm or 18mm in size or even different in different dimensions that's telling you that the steps millimeter are very wrong.
Change EEPROM Settings
What you can do change EEPROM settings from Repetier. You can actually look at what the measurements are for steps per millimeter in the machine, and then you can change them.

Before the calibration, you need to know the extrusion amount first with 100mm.
Basically what you need to do is tell the machine to move a certain known amount, for example 100mm. You need to mark what the actually movement is. Then you could use the following formula to caculate the new steps per mm value:
New steps per mm value =Old steps per mm x [distance / distance_actually_moved]

Extruder E Steps Tuning
There's also worth checking your extruders steps per mm, also known as e-steps. More detailed tutorial on our blog How to Calibrating 3D Printer Extruder.
Strings - Incorrect Retraction Settings
Next is stringing stringing is the bane of 3d prints. It really does ruin your part accuracy, especially if you have parts that are meant to move together.
Stringing is caused by a number of factors but generally it's caused by incorrect retraction settings.
Possible Causes of Strings:
● Insufficient retraction amount.
● Too much retraction.
● Z Hoop.
● Filament too hot.
● Filament has absorbed moisture
Plastic filament goes through a hot end, melts, and extrudes molten plastic out to create the part. When the hotend needs to move between points, it can't just stop because there's like a built up pressure in the hot end. And the molten plastic is in liquid so it would drip out on its own.

Then we need retraction settings which pulls the filament back a certain amount to relieve that pressure and hopefully stop it dripping out of the hot end.
Different printers, different extruder designs, different nozzle designs, different hot end designs all have different retraction requirements. The creality ender 3 bowden style extruders, where they have this long tube, where the filament's forced through, generally need a much higher amount of retraction than direct drive extruders.

You could print out this really simple stringing test it takes like 10 minutes to print. and i would start with some sort of default setting and then see what it looks like. This is an example of a print with very very bad stringing where essentially it hasn't.
There's also various other attraction settings to think about, such as the retraction speeds.
Retraction Speed:
● Too slow isn't effective.
● Too fast can strip the filament
The "wipe / wiping" in Cura is really a key for very dribbling extruders. It'll sort of stop extruding and do a little wipe in the part before moving. It helps a lot to cut stringing down.
Having zed hop, that is have the machine lift up in z before moving, increases stringing but also decreases the chance of collisions.
Zed hop is meant to moving the nozzle up between points. The movement adds time, and therefore that plastic can start dribbling out and add stringing.
Finally there's the material to consider. Different filaments have different tendencies to string, for example flexible filaments string a lot. Some materials will absorb moisture, like nylons and that makes them bubble and spit as they extrude. So if you don't fully dry them they'll force filament out across points. Even if you have the best retraction settings in the world, it'll still string like crazy.
Cooling and Overhangs
Insufficient cooling is my pet peeve for 3d printers. Cooling ducts can really affect part quality.

f you want to print better overhangs, you either need to decrease your layer height or increase your extrusion width. Basically what you need to do is make sure you have as much of that previous layer being covered by the new step over layer as you move up.
Overhangs often look bad is because that overhang needs to be cooled quickly or it will droop down. For pla, at least, you want the cooling to be as strong as possible. You want it to hit that previous layer bond and then solidify in place as quick as possible and that way you'll get the best looking print.
The problem of cooling ducks on most commercial 3d printers is they're unidirectional. It comes from one direction, and that means when you print overhangs in the direction that the cooling ducts facing, they'll cool quicker but the overhangs on the other side will not. Because it's facing the wrong way. And you'll get a visible quality difference of your overhangs depending on what direction the fan duct is facing.

That is why omnidirectional fan ducts are good. Fan duct doesn't just
have overhangs to contend with it. Bridging is also a cooling thing. To get good bridges, you need really good cooling because you're stretching across gaps with molten filament.
If you find your bridges droop and not forming correctly. That is a cooling problem which can be addressed with upgrades or by changing your print speeds. Printing slower doesn't make them better. You need a certain amount of speed to do them. If you go slow, they actually kind of just tend to droop down on their own even if you have decent cooling.
Layer Accuracy
If you notice that the layers seem to be really inconsistent or maybe there's a pattern to that inconsistency of your print, then you have layer accuracy issues. and again there's many things that can cause this.
● Bent leadscrew
● Bad coupler
● Loose ACME Nut
● Loose hotend / motion components.
● Temperature Fluctuations (bad PID)
A bent lead screw will very quickly ruin your accuracy and clearances. And you can't fix a bent lead screw. You just have to get another one. If you suspect you have a bent lead screw you could pop it out and then roll it on a sheet of glass or like a flat bench top.
If it's not bent it might be the print coupler. Z-axis coupler sometimes damage. It might be the actual acme nut that secures to the lead screw. Sometimes they're fixed at a weird angle or they're loose. All these things can give you accuracy issues. When your extruder assembly is a little bit loose, and the hot end is actually moving a little bit and that will completely ruin your layer accuracy. And then there's pid tuning.
There are so many variables when it comes to these 3d printers. You need to change one maybe two variables at once. Don't try to fix everything at once, because you're gonna just frustrate yourself.
Hi, do you have a batch of setting values for the Kingroon KP5L using PLA. I am having really bad luck right out of the box
nice video
John