UPDATE:
This tutorial ha been updated on 2022, please check the below videos and get the latest firmware to use.
NOT MARLIN | How to Enable Auto Bed Leveling Feature on KINGROON KP3S 3D Printers
https://youtu.be/s2ZiibBKVKI
2022/02/18
【Firmware Released】 How to replace mainboard for KINGROON KP3S 3D Printers
https://youtu.be/LBa8X6U1Y_w
2022/05/15
KP3S 3D Touch Firmware(STM32F103/GD32F303) V1.0.7_2022.03.30:
https://drive.google.com/drive/folders/1eDY91nCIgY-3owwBqj1e4Szzl0qyVd9j?usp=sharing
If you get the wrong axis direction issue, click below article, step 4 will help you:
https://kingroon.com/blogs/3d-print-101/modify-mainboard-configuration-file-of-kingroon-kp3s
You can flash back to the stock firmware any time, just remember to unplug the cable on the extruder:
https://1drv.ms/u/s!AmGcVrncIH3ZhiM0p_CYANOff-UR?e=nvbJvf
3D Touch Hanger: https://drive.google.com/drive/folders/1rYdTBTf4XtJGof0uk9KzDwkJOqeNtTP6?usp=drive_link
To install 3D Touch leveling sensor on Kingroon KP3S 3D printer, we would recommend you to use it based on Marlin firmware.
Kingroon KP3S 3D Touch Mount
https://www.thingiverse.com/thing:4609134
3D Touch Wiring to the Mainboard
Plug 3D Touch wires into the corresponding ports on the mainboard of your Kingroon KP3S.
The white line is the signal pin. The black line is the ground. There are information on the board. S for signal. G for ground.

The colors of cables may varies from different bltouch manfacturers. There are 3 pins port on the mainboard: G, 5V, S. Insert the connectors to the 3 pins port accordingly.
Here is the cable information of the 3D Touch on our site:
Green line: -, GND
Red line: + 5V
Yellow line: signal line

Update 3D Touch Firmware for KP3S
Kingroon KP3S with 3D Touch leveling sensor modification firmware to DOWNLOAD.
Configure the Z-offset Value
To configure the Z-offset value of Kingroon KP3S. Open the .txt file in the firmware files you downloaded from the above link.
1. Change the mode as” cfg_leveling_mode” 1

2. Setup endstop into Z Min_Probe_endstop_inverting 0 # Z probe

3. Set the leveling probe on Zmax: Z_min_probe_pin_mode 2

4. Setup the X, Y, Z axis offset.
If the distance between the extruder and the platform is too close when printing, then reduce the Z-axis offset value, otherwise, increase it. Normally, we don't need to change the value of X probe offset from exand Y probe offset from extruder.

5. Set 3 (grid points) as bed leveling method
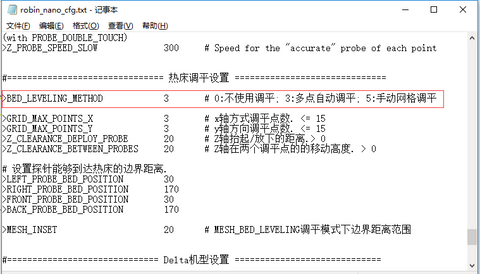
6. Set leveling range as follows

7. Run 3D Touch on Kingroon KP3S: 3D TOUCH 1

Adjust the Z-offset Value
Now everything is ready to start adjusting the Z-offset value of your Kingroon KP3S. You need to adjust the Z-offset on the above .txt file as well.
Adjust the Z probe offset from extruder value down a little at a time to avoid your nozzle crashes into the heatbed and leads to any damages.
In this firmware version, you could only adjust Z-offset value through the .txt file in the firmware. Do not support Z-offset adjusting on control screen.


Hi, could you please help me find firmware for autolevel and laser in one for KP3S?
SOLVED:
I fixed it. So if you happen to see or hear anyone having issues with the KP3S and 3d Touch with Marlin… Send them to this comment. Or simply tell them that the video above that Kingroon puts out tells you to put the 3d touch 2 pin into the Z+ slot… Thats incorrect.. You actually need to unplug the stock Z endpoint sensor from the Z- Slot and then plug the 3D touch into that one. Then all of the calibrated builds for Marlin on git hub.. Will work with the 3D Touch and the extruder will move in the correct direction during probe wizard and everything else
I tried to install the autoloveling probe, but I couldn’t set the correct fw. the print head kept going somewhere outside the desktop. And I ended up not printing at all, because even after uploading the original fw without autoleveling, I can’t convince the printhead not to go outside the workspace. How do I get the printer to factory settings?
Which firmware to upgrade on KP7? Thanks
I’m having an issues with the firmware. As I don’t have the auto level after flashing? I have the Kp3s pro S1 with a 303 board. Seems to be wired correct but no auto level settings. if I use the conventional levelling settings once my printer hones the Z axis it freezes and you can’t manually move any axis?
Just wondering what might be going on?
Does the printer need to be manually levelled before auto level is an option?